Your Self-Help Guide on How to Change AirDrop Name on iPhone iPad and Mac
Do you know that the trend of Airdropping from Apple devices is rising at a rapid rate? Just think about your Airdrop name. Have you ever wondered how this simple task becomes intricate when users get muddled with the same name occurring many times in their Airdrop section?
Finding it difficult to discover the solution? Relax and take it easy because you are at the right place. This write-up will guide you on how to change the Airdrop name on different Apple devices. Let’s begin.
What is AirDrop?

Airdrop is a file-transferring technology that combines the use of both Bluetooth and WiFi while transferring files. It is faster than Bluetooth, and thus works more effectively and efficiently. This invaluable AirDrop feature is available on Apple devices only such as iPhone, iPad, and Mac.
Photos, screenshots, pdf files, and any other type of media can be shared by Airdropping quickly. Both receiver and sender have to be in a network range. As soon as they are in a suitable range, data can be transmitted easily.
Its pivotal benefit is that the quality of the files remains the same and that’s why Apple users prefer airdropping the content over any other way. The only drawback is that it consumes a considerable amount of battery quickly as WiFi is getting used substantially while airdropping files.
Why Should You Modify AirDrop Name?
There is a genuine need to alter your airdrop name. Your Airdrop name matches exactly the default name of the respective Apple device you are using, say iPhone, iPad, or MAC.
While Airdropping, users will require your airdrop name. While scanning for your device, chances are probably high that they can see an airdrop name many times in the search section. It happens because a lot of users are present in your area who are using the same Apple device.
The sender or receiver will be confused in recognizing the actual name of your airdrop out of all those already available with the same name. To prevent this serious complication, you should alter your AirDrop’s default name.
What Should Be Taken Care Of?
- Make sure that your device supports airdrop features. If you are still unaware, then know that only iPhones and iPads operating iOS 7 or later models are embedded with the Airdrop feature. Moving further, this feature was supported by Macs and MacBooks, running minimum OS X Yosemite, as well in 2012 or later.
- To use this feature effectively, you should use the most updated version of the software. To update the operating system, Open
Settings (available on Home Screen) >General >Software Update.
In case you can see a newer version of the operating system in the Software Update Section, then start downloading it. Install the software once the download gets completed.
How Do You Change Your AirDrop Name?
The airdrop feature works incredibly well while exchanging data from one device to another. To make your airdrop name distinct from others, who also share the same default name as yours, you have to change your airdrop name. There are different methods for different Apple devices. Let’s get into every particular process one by one:
How To Change AirDrop Name on iPhone?
To modify the airdrop name on your iPhone, go to Settings> General> About. In the last section, you will see the name of your Airdrop. To change this default name, open your contacts because the Airdrop feature has a direct relation with your contacts. You have to update everything related to this process in your contacts only. Let’s see how the process goes:
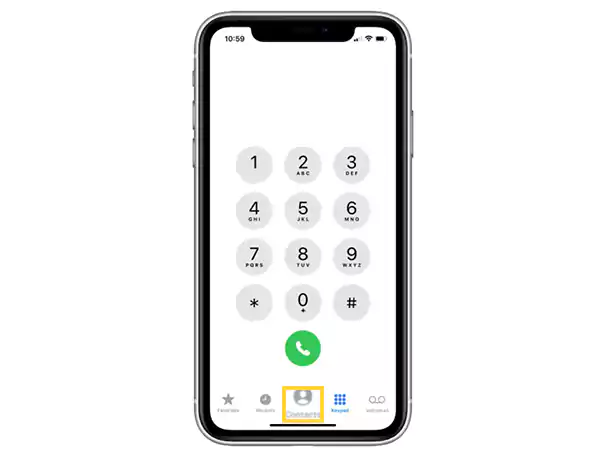
- Go to the dialing pad of the iPhone. At the bottom of the screen, you have to tap on the option that reads, “Contacts”.
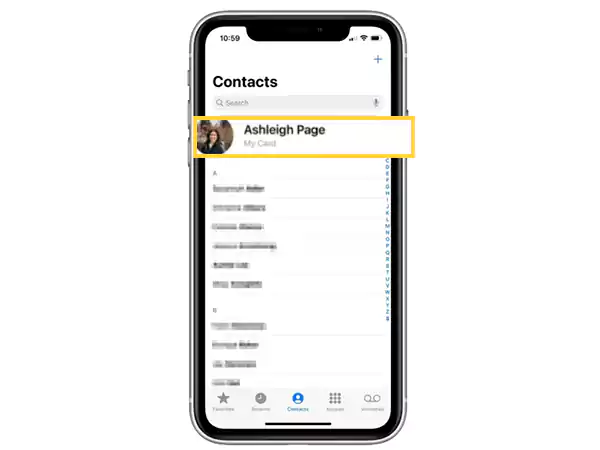
- Click the option on the topmost part of the page that reads, “contact card”.
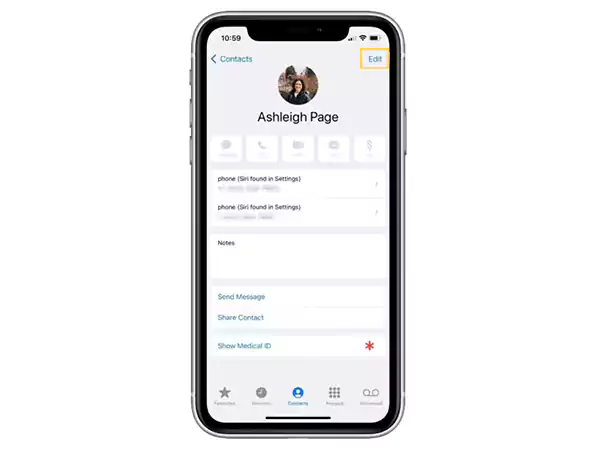
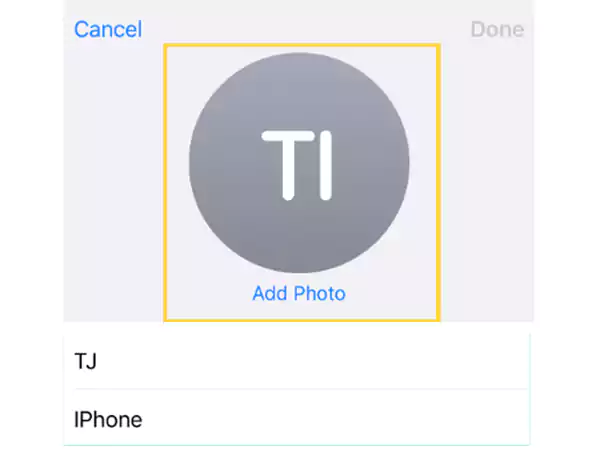
- Tap “Edit”, available on the right topmost corner of the page.
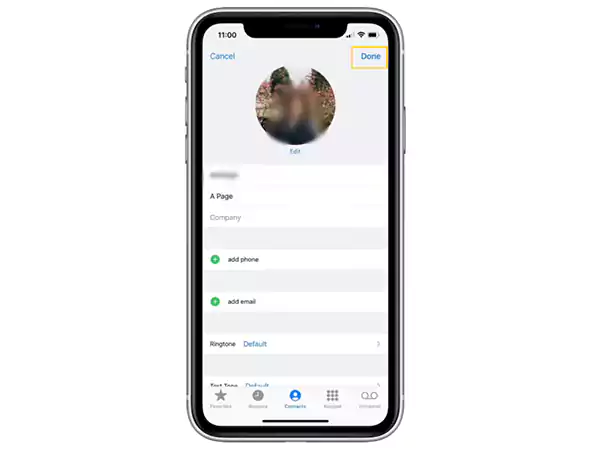
- Rename your Airdrop according to your wish. Tap on “Done” after you have typed the new name. The option is available in the upper right corner again.
Now onwards, anytime a user tries to Airdrop you something, they will be able to recognize you clearly by the new Airdrop name you have created and updated successfully.
To make yourself more unique from others, you can also add a photo to your contact card. To do this simply tap on “Add Photo”.
It should be noted that it may take some time to actually make your device appear on other devices even after updating all the changes. However, if you cannot locate your device on others’ devices after waiting for so long, you have to reset your network settings. In order to update it, follow the below-mentioned steps:Open Settings >General >Reset. In the last head, you will see an option for Network Settings. You have to reset the network settings. As soon as you tap on network settings, your phone will restart again. After the reset is done, you are supposed to check your name on another device. This time you will be able to see that your new name appears on the others’ device list. Congrats you are done.
How To Change AirDrop Name On iPad?
To change the airdrop name of your iPad, you don’t have to alter the settings from contacts, instead, the name of the iPad should be reformed. This is the only slight difference here from the previous one. Now, let’s dive into the steps:
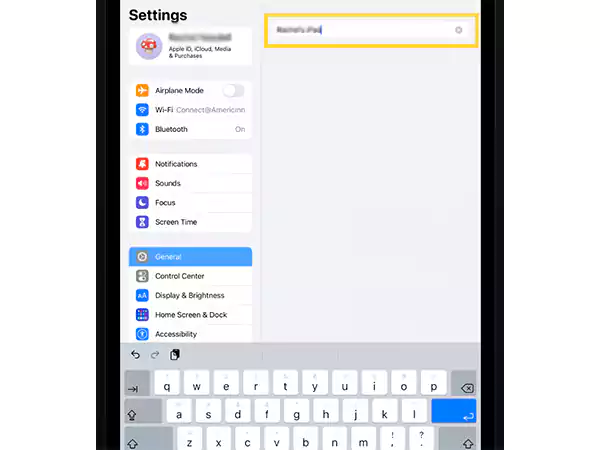
- Go to “Settings” and then “General”
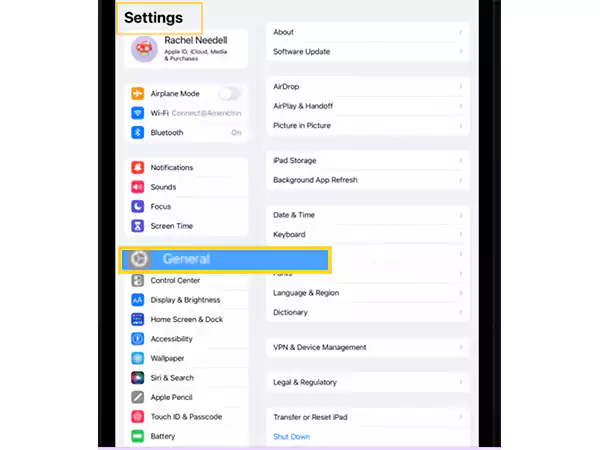
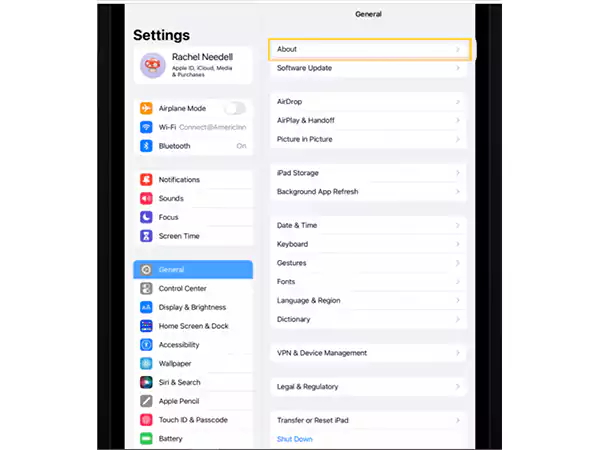
- In the General section, search “About” and click it as soon as you locate it.
- You will be able to locate a menu panel on the left-hand side out of which click “Name”.
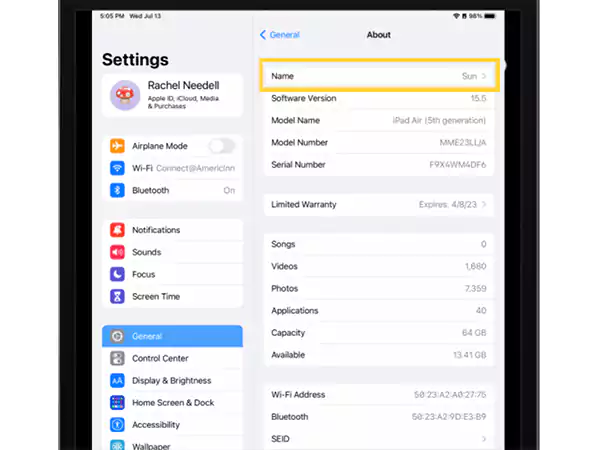
- You can rename from this option. Type the new name for your Airdrop that will be displayed further. Click “done” after you finish typing a name.
Hurray, you have successfully changed your airdrop name. Now your Airdrop will be visible with your updated name to the users searching for you in the AirDrop section.
How To Change AirDrop Name on Mac?
If you want to transfer any file or document between a Mac or Macbook, and any Apple device, then AirDropping would be quite easy.
Assume, you want to send or receive data through a Mac using the Airdrop feature, then, before proceeding to the steps, first, you have to make sure that your Mac has a name that is easily recognizable within the local network.
To change airdrop name on your Mac, you have to follow a very simple process just like you have seen for the other types of devices explained above.
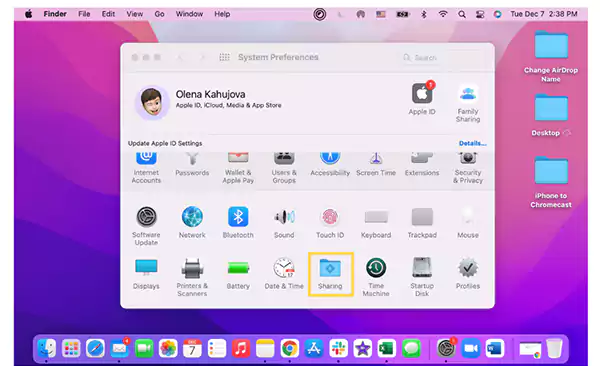
- Open your Mac. The Apple icon, which you are able to locate on the topmost corner of the left side should be clicked. Then, go to System Preferences. So, it can be presented as
“Apple icon <System Preferences”
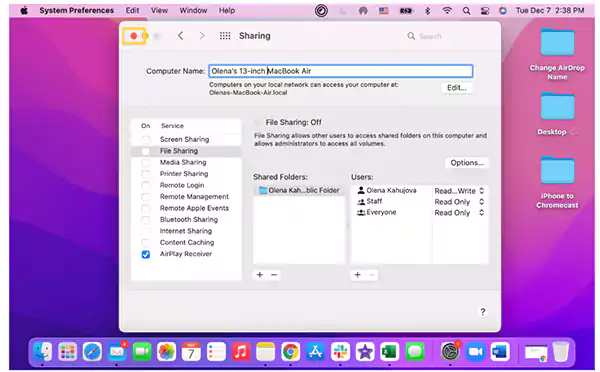
- In the System Preferences, click on “Sharing”.
- You will see a box with the head “Computer Name”. Fill in the new Airdrop name you want to use for your Mac.

- As soon as you have typed the name, close the window by clicking on the red circle which you can see in the top left corner. Your changes automatically will be saved.
And that’s it. With the completion of the last step, you can easily send any kind of documents, links, live locations, photos, videos, and much more to any iPhone, iPod touch, iPad, or other Mac by doing Airdrop.
You may view the above process as pretty long and thus time-consuming. To escape from this long process, I will provide you with another shorter method that can be applied to change the Airdrop name of Mac. Let’s see how it goes:
Well, there are two such alternative methods. Let’s discuss both of them.
By Using The “Finder” Feature
The first solution is by using the “Finder” feature. Read the following guidelines and see how it is used:
- Go to “Finder”. Tap “Go”, which you can locate on the upper bar, and then Click on “AirDrop”. So, it can be presented as
Finder >Go >AirDrop
As soon as you tap AirDrop, all the available AirDrop users can be seen through the AirDrop window.

- Afterwards, you can select any media you want to send. For this, simply drag any photo, document or any other file to the recipient by choosing his/her Airdrop name in the window.
- Drop the selected data into it. And with this, the sending process is completed.
By Using The “Share” Feature
The second alternative is through using the “Share” feature. Let’s see how it works:
- Go to the photo/video/document or any other media which you want to send to your recipient.
- Within the app, click “Share”.
- In the Share menu, click on the option, “AirDrop”. This option is available in the multiple options given under the Share menu.
- Search for the recipient and select the right one to whom you want the data to be transferred.
The process won’t get initiated unless the person on the other side doesn’t accept the same. Hence, you have to wait for the device on the other side to accept your data.
- As soon as your file is sent, You are supposed to click on “Done”. Hurrah, the process is that much simple.
NOTE: It’s up to you to either accept or decline the Airdrop request whenever you get any Airdrop notifications from someone in your same local network. You will receive the pop-up message in two places, first as a notification and other inside the AirDrop window.If you click decline, then there is nothing to proceed with anything further. The process ends here itself. While, if you click accept, you allow your device to accept the data from the other device which lets you download the data as well in the respective folders. Though the data received through Airdrop is saved in Mac automatically, to your Downloads folder.

What Should Be Done When You Can’t See Other Devices?
Let’s presume that you are airdropping something to another Apple user. In between, you face an issue when you can’t see the Airdrop name of another user. You may not see the name in the AirDrop window. What should be done now?
Before going into a deep analysis, check whether both devices, i.e, the sender and the receiver have turned on WiFi and Bluetooth. Another thing to make sure of is the distance between both devices. The distance between the devices should be within 30 feet of each other.
The above explanation is just the basics. Usually, that’s all that needs to be done to fix the issue. However, if you couldn’t get your problem solved, then altering the advanced settings will help. Let’s have a look at how it goes:
For iPhone, iPad, or iPod touch
- Go to the Control Center. Check the Airdrop settings. See whether your airdrop is switched to getting content from the saved contacts only. If such is the case, the sender and the receiver, both are required to log in to iCloud.
Additionally, the sender’s contact number or email address, which is connected to the sender’s Apple ID, is to be added to the receiver’s IOS device’s contacts app.
- If nobody is able to view you, you can’t see the Airdrop option, hence, change from Contacts Only to Everyone to get visible on other devices easily.
- If your personal hotspot is on, then switch it off when you are using Airdrop. To turn it off, open Settings and then choose Cellular. This has to be done on the recipient’s iOS device.
For Mac
- Check if the AirDrop is turned on in the Finder. You can also check it by clicking on Go <Airdrop in the menu bar.
- It may also happen that due to some restriction made in the settings, you are not getting discovered by other devices. To amend this, you have to check the option that reads, “Allow me to be discovered by”. This feature is available at the end of the Airdrop window.
- It may be possible that the Mac, which is a receiver, uses OS X Mavericks. If it’s so, then you have to open an Airdrop window. For this, you again will select Go >AirDrop in the Finder from the menu bar.
You have to look over some setting options, which if checked, restrict the easy transfer of data between two devices. Similar to such a setting is “Block all incoming connections”.This is available;e in the “Security & Privacy Preferences”.
If this setting is turned on, then switch it off again by exploring Mac’s settings. After you switch it off, you will see that airdropping files through Mac would be possible.
Final Words

To conclude, the Airdrop feature works very well on all iOS, iPad, and Mac devices. Any kind of data, be it photos, videos, pdf files, links, or anything else, can be shared fastly in a very easy way. The only point of concern here is that the Airdrop names should be noticeable among all the same iOS devices which may have the same default name.
To make sure that the files are transferred to the right device, the airdrop name must be changed. Once changed, the process works more smoothly than before and confusion gets eliminated. So, don’t wait anymore and start sharing the content with other apple devices by airdropping them.