Here’s Why iPhone Won’t Charge & How to Fix This Issue!
At least once in our lives, we all have gone through this situation and thus, we can imagine how bad it feels when you connect your iPhone to the charger and later find out that it doesn’t charge at all.
Despite the fact that iPhones are built with the utmost precision and care, they are prone to common errors and issues. Out of many, one of the scariest and most annoying iPhone problems is the “iPhone not charging.”
So, if you are facing this problem and that is why you are here to know the reasons why your iPhone won’t charge and what are its possible fixes, then you have made the right decision.
In this guide, we will enlighten you about everything that can cause an iPhone charging problem and discuss how you can eliminate all those possible causes with relevant solutions.
Having said that, let’s get started—
- What Can Cause You to Experience an iPhone Not Charging Issue?
- What Are the Possible Workarounds to Fix iPhone Not Charging Issue?
- Solution 1: Clean Your iPhone’s Charging Port
- Solution 2: Inspect Cable for Loose Connection
- Solution 3: Check Your Cable If Busted or Not
- Solution 4: Ensure Your Charger is Not Damaged
- Solution 5: Check the Outlet
- Solution 6: Use Apple-Certified Charging Accessories
- Solution 7: Liquid Damage
- Solution 8: Ensure that the Case Supports Wireless Charging
- Solution 9: Disable Optimized Battery Charging [If Applicable]
- Solution 10: Update the Software
- Solution 11: Hard Reset Your iPhone
- Solution 12: Reset All Settings
- Solution 13:Restore Your iPhone
- Solution 14: Take your iPhone in for Service
- Bottom Line
Q: If My iPhone Won’t Charge, Do I Need to Replace/Change the Battery?
A: It has been observed that one of the most common queries received by Apple tech is when the user’s iPhone is not charging and unfortunately there is a lot of misinformation about it that you will read on many websites. So, let us make it clear once and for all that the answer to this question is NO!
Changing the battery is a completely wrong thing to do because most of the time, it is your iPhone’s software and not the hardware that is preventing your iPhone from charging.
What Can Cause You to Experience an iPhone Not Charging Issue?
Believe it or not, but even for a simple task like charging, there are many components involved that need to function properly. Thus, there can be many reasons behind this annoying issue. For instance—
- Uncertified charger: The problem could be caused by a local charger, or you never know there could even be a scrap of lint that got into the charging port.
- Loose connection: This could either be because the connection between your cable and your iPhone’s charging port isn’t good enough or the USB connector isn’t plugged in properly.
- Damaged power adapter: There can be issues with the charging adapter such as it being damaged.
- Incompatible rugged cases: This could also be due to a rugged case that might not be supporting Qi-wireless charging.
- Software failure: There could be faulty software that is preventing the phone from charging or an underlying hardware issue.
Apart from a damaged adapter, incompatible cases and rare software bugs—other causes such as uncertified charger, bad charging habit, dirt that may have clogged up the charging port and liquid damage can also be responsible for the charging issue on your iPhone.
However, don’t worry about them as issues like this are usually easy to address.
What Are the Possible Workarounds to Fix iPhone Not Charging Issue?
A total of 14 fixes are mentioned here to solve the ‘iPhone not charging’ problem. So, keeping in mind the reasons discussed above, you can try these viable solutions accordingly—
Solution 1: Clean Your iPhone’s Charging Port
Since your charging port is just a hole in the middle of your phone that is a dust prone area, it can collect not only dirt but also lint and other debris that is small enough to fit inside the hole.
So, if it’s been a while since you’ve cleaned your respective iOS device’s lightning port then, the port is likely to be packed with pocket lint that can prevent the connector from making a strong and stable connection.
In other words, if dust or debris collects inside the charging port of your phone, they will block the power connection pin. An iPhone’s port has nine connectors, so if the wrong one is blocked, it can completely prevent the device from charging.
Therefore, it is suggested that before troubleshooting software or hardware related charging problems, you should make sure that the lightning port of your iPhone is not clogged with dirt and debris.
However, if you wonder this—‘how do I clean my iPhone charging port?’
Let us tell you how you can clean the port of your iPhone—
- You need to first shut down your iPhone.
- Then, take a normal toothpick and use it to remove the lint gently. However, remember that you can’t use water when cleaning because if an iPhone comes in contact with water, the ports can get compromised, especially if you have an iPhone that isn’t water resistant.
Note: You have to be extra careful while cleaning the port as the pins can get damaged and then, you will be left with no other option but to replace the charging port.
Solution 2: Inspect Cable for Loose Connection
Next, you need to check your cable to make sure that the connection between the cable and your phone is stable.
Also, your iPhone may stop charging if the Lightning charger has a loose connection to the wall outlet. So, keeping this in mind as well, you need to check whether the power plug is well inserted into the power outlet.
To be precise, you have to make sure that the connection remains stable so that there are no interruptions while the iPhone is charging.
Solution 3: Check Your Cable If Busted or Not
Needless to mention, iPhone cables are known for their fragility. Therefore, it is likely that when you bend your charging cable too often, you risk its durability.
While some of your exposed iPhone lightning cables may work for a while, you never know when it stops doing so. So, take a very close look at both ends of the USB cable you use to charge your iPhone. And, if you see visible signs of damage, it’s high time to ‘get a new Lightning cable’ to check if a faulty cable is the problem for which you are unable to charge your iPhone.
Tip: If your iPhone is still under warranty, Apple will replace your Lightning cable (as long as it’s in good shape) and everything else in the iPhone box for free.
Also, it is to be mentioned that you need to be cautious when it comes to your charging cables. You should protect it by using it with care. For example—
- You’ve to be careful to not tangle the cable under your chair or any other furniture.
- You must keep your cable in a safe place where you can guarantee that it will not be damaged after use.
However, you can never be too careful with the charging cable. Thus, there are lightning cable accessories that you can get to protect your cable from permanent damages.
Solution 4: Ensure Your Charger is Not Damaged
If your iPhone is still not charging, check your iPhone’s charger to make sure that it is not damaged.
While reading this, if you wonder— ‘how do I know if my charger is damaged?’
Then, let us tell you that the simplest way to find out whether your charger is the culprit or not is to try another one.
Tip: You can also try other methods like charging it with a computer, power bank, and even a car charger.
In this regard, make sure you try more than one as chargers can be very over-particular.
Note: This has to be done for the purpose of swapping to a different charger, so you can see if that makes a difference.
Doing this, if you find that your iPhone charges with one adapter and not the other, then your charger is the problem! But, if your iPhone still doesn’t charge after changing the charger, that’s not the root of the problem.
Solution 5: Check the Outlet
After checking your charger and your iPhone charging port for any problems, you should check your outlets too! This is because if there is no problem with your charger and port, it is likely that your outlet is the problem.
Thus, to check if there is a problem with your outlet, either use different chargers or plug different things into it.
Now, if everything works including your charger, there is no problem with the outlet.
But, if everything doesn’t work including your charger, then it’s clear that your outlet is the problem causing your iPhone not to charge. This is arguably a bigger issue than a broken charger as outlets are notoriously difficult to repair.
However, that doesn’t mean you can’t repair it. So, until you get your outlet fixed, you can use a different outlet to charge your iPhone.
Solution 6: Use Apple-Certified Charging Accessories
If in your case, the outlet is not the culprit and your iPhone is still not charging, then answer – Is your charger Apple-certified?
If not then, you should never use such chargers/cables as they will not be able to charge your iPhone.
However, Apple-certified doesn’t mean those chargers/cables that you can get exclusively from an Apple Store. Rather, having an Apple-certified cable means that a charger/cable has a label that says “Made for iPhone” on it.
But, such a label may be placed on the cable or Lightning charger itself, so the only way to confirm whether you are using an Apple-certified cable/charger is that when you use the accessory that isn’t Apple-certified; your phone will notify you.
To be specific, you’ll get an alert that says “Your Accessory is not Apple-supported.’ So, the bottom line is that you need to make sure to use Apple-certified charging accessories.
Solution 7: Liquid Damage
Just as dirt and debris can prevent a phone from charging when it gets stuck in the charging port, liquid damage can also cause a similar problem.
Wonder how?
Let us tell you that the liquid damage shorts the connection located in the charging port and this interferes with the charging process. Also, keep in mind that even a little water inside the port can short out the connection which can not only damage the charging capability, but also cause more dire problems.
So, if you have accidentally dropped your phone in water recently, make sure you put it aside to dry completely before plugging it into the charger.
Solution 8: Ensure that the Case Supports Wireless Charging
If you use a wireless charger to power your iPhone (model 8 or above), make sure the case is compatible with wireless charging. This is necessary as not all iPhone cases support Qi-wireless charging; especially those covers that are rugged or have ring holders and metal backplates.
Moreover, some cases lack precise cutouts for ports and buttons. This makes it difficult to adjust the side and volume buttons, as well as plugging the charger into the port.
So, if due to this, the connector is unable to make a strong connection, you can try charging again after simply removing the case.
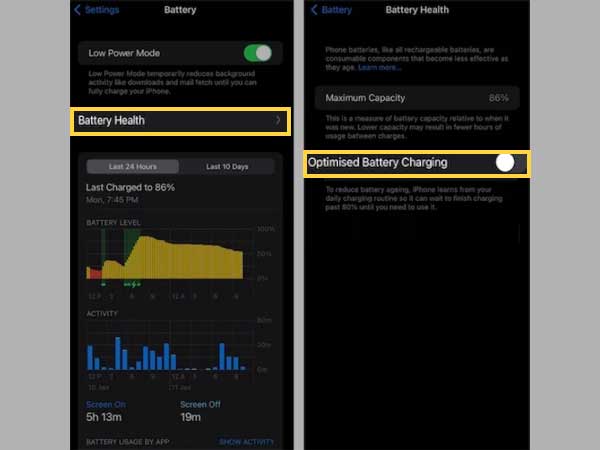
Solution 9: Disable Optimized Battery Charging [If Applicable]
If your iPhone charges but stops charging after 80%, let us tell you that it is because the iPhone monitors your daily charging routine and in some situations it stops charging automatically after it will charge up to a certain percentage.
Although this is a well-thought-out feature designed to improve battery life, it can be problematic at times.
However, don’t worry! If you want full control over the charging of your device, you can choose to disable the customized battery charging feature like this—
- First, open the ‘Settings app’ on your iPhone.
- Then, navigate to the ‘Battery’ section.
- There, tap on ‘Battery Health.’
- Now, just turn on/off the ‘Optimized Battery Charging’ as per your needs & requirements.
Solution 10: Update the Software
Although the charger, charger port, and outlet are key components of charging, it is the iPhone itself that decides its charging.
This means, there are also instances when the problem is not related to the charger, outlet or the charging port but to the phone and its software.
So, it should come as no surprise that if you haven’t updated your iOS for a while then, an outdated software version might be the reason for your iPhone not charging.
More specifically, if the software on your iPhone is out of date or faulty, it can cause your iPhone not to charge.
Thus, make sure that you update your iPhone to its latest version, as a mere software update can help you fix many problems on your iPhone, including the one related to charging.
Not only this, it can also enhance the performance of your iOS OS for better functioning.
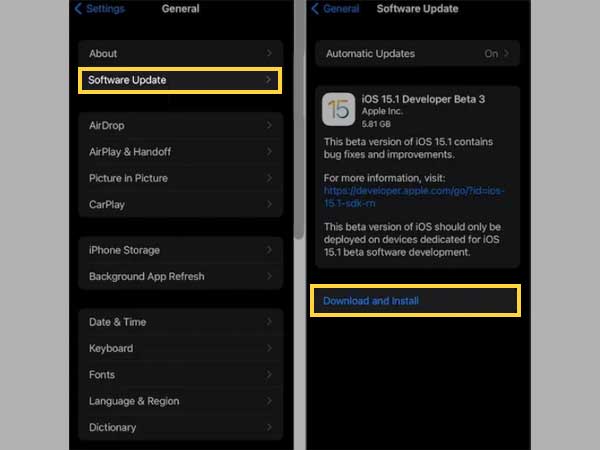
That said, here’s how you can update the software—
- Firstly, open the ‘Settings’ on your iPhone.
- Then, tap on ‘General’ and following that, tap on ‘Software Update.’
- Now, allow your device to scan for an available update.
- If an update is available, you just have to tap ‘Download and Install’ to get the latest version of iOS without wasting any minute further.
After you have updated the iOS, make sure to also restart your iPhone and once your iPhone has restarted, plug it into a power source to check if the charging has begun or not!
Solution 11: Hard Reset Your iPhone
At times your software will cause your phone to stop charging if a power fluctuation is detected. It acts as a protective measure to maintain your phone’s battery and longevity.
However, this is not necessary as it can be a minor glitch also. So, if it is just a minor glitch, what you can do is to try a hard reset—
Note: This is the first thing Apple Tech will do in the Apple Store. So, there is no harm in trying it yourself at home.
| iPhone Model | Hard Reset Process |
| iPhone 8, X, SE 2 & other newer models | Firstly, press and release the volume up button. Then, press and release the volume down button. After that, press and hold the power button (which is called the “Side button” on iPhone X) until the screen goes black, and the Apple logo appears on the display. |
| iPhone 7 & 7 Plus | Simply press and hold the power button and the volume down button together until the screen goes black, and you see the Apple logo appears on the screen. |
| iPhone 6S, SE, & other older models | On these models, you’ll need to press and hold the Power button and Home button simultaneously until the screen goes black and the Apple logo appears on the display. |
Also Read: iPhone Screen Not Rotating? Here are the Fixes
Solution 12: Reset All Settings
In case, your iPhone is still refusing to charge, don’t give a second thought to trying factory resetting your phone.
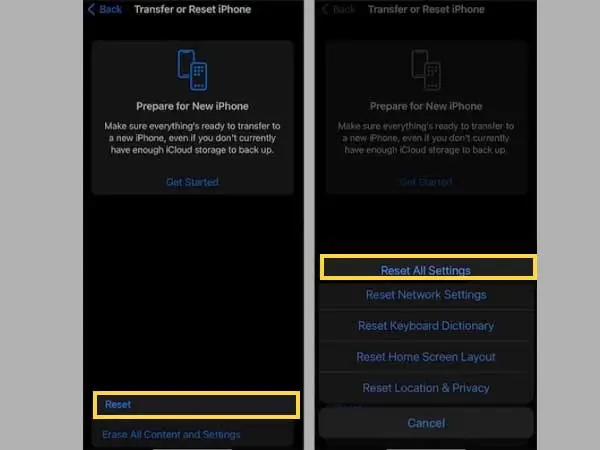
Factory reset is a very reliable fix for a wide variety of issues especially when you are up against such complex issues. So, keeping that in mind, here is how you can reset all settings on iPhone—
In iOS 15 or later
- Open the ‘Settings app’ on your iPhone.
- Tap on ‘General.’
- Navigate to the ‘Transfer or Reset iPhone’ section.
- Tap on ‘Reset,’ followed by ‘Reset All Settings.’
- H4-In iOS 14 or later
- Launch the ‘Settings app’ on your iPhone.
- Tap on ‘General.’
- Next, tap on ‘Reset.’
- Finally, tap on ‘Reset All Settings’ to confirm.
Solution 13: Restore Your iPhone
If even the software update, hard reset and factory reset procedure doesn’t help, you may have something beyond just a minor glitch; some more-deep rooted problem.
In that case, you can consider the DFU “Restore” option. However, you should try it only when none of the basic tricks are working.
Those who don’t know, a DFU restore is a special kind of restore that can solve severe software issues along with this also.
Note: Before trying this solution, you should take a complete backup of your iPhone. This is because when you restore your iPhone, the restore process will erase all existing data and restore it to factory settings.
That said, here’s how you can restore an iPhone in DFU mode—
On iPhone 8 Or Newer Models
- Begin by pressing and releasing the ‘Volume Up button.’
- Then, quickly press and release the ‘Volume Down button.’
- Next, press and hold the ‘Side button’ until the screen goes black
- After that, when the screen turns black, press and hold the ‘Volume Down button’ while continuing to hold the ‘Side button.’
Note: Do not hold it for too long otherwise you will have to start the process from the beginning.
- Now, after 5 seconds, release the ‘Side button’ while holding the ‘Volume Down button’ until your iPhone option appears in “iTunes or Finder.”
- Once your iPhone option appears in iTunes or Finder, release the ‘Volume button’ and you’re done. Your iPhone is now restored in DFU mode.
On iPhone 7 Or Older Models
- Firstly, plug your iPhone into your computer.
- Then, if you have a Mac running macOS Mojave 10.14 or a PC, open “iTunes.” Alternatively, open the “Finder” if you have a Mac running macOS Catalina 10.15 or newer.
- Next, you need to simultaneously press and hold the ‘Sleep/Wake button and the Home button (iPhone 6s and below) or the Volume Down button (iPhone 7).’
- Now, after 8 seconds, you have to release the ‘Sleep/Wake button.’ But, at the same time, make sure you hold down the ‘Home button’ or the ‘Volume Down button’ till your iPhone option appears in “iTunes or Finder.”
- When your iPhone option appears in “iTunes or Finder” what you’ve to do is release the ‘Home button or the Volume down button.’
- In doing so, your iPhone’s display will be completely black and this means you’ve successfully entered DFU mode. However, if it’s not, you can try again from the beginning.
After restoring your iPhone, try charging it to check if the charging issue is resolved!
Solution 14: Take your iPhone in for Service
Lastly, if none of the above methods help you fix the ‘iPhone not charging’ issue then, you might have to get your iPhone repaired.
So, what you can do is either take your iPhone to the nearest Apple Store for service or, you can contact Apple Support representative for a detailed guide on how you can address the problem.
Bottom Line
That’s all! Hopefully with this guide, we were able to help you fix the problem behind your iPhone not charging. So, whenever an iPhone does not charge, it is usually one of the above reasons and, there are always ways like we have mentioned in this post that you can do to prevent this problem from occurring again.