Effective Methods to Fix Headphone Detection Issue for Windows 10
It’s Saturday night, you are watching a movie after a long day at work and all of a sudden, an error pops up on your system saying that there are no headphones plugged into this device. The first question that pops up in your mind is “Why on earth won’t my headphones show up on my computer?”.
This is the ideal scenario for a user who is facing the headphones not showing up in the Windows 10 issue. Most users can’t understand why their headphones stopped working since they were working just fine a couple of hours ago.
This headphones error in Windows 10 can occur due to several reasons. In case you are also looking to fix this issue, get in line as we have for you a simple guide that can help you to better understand why the error occurred in the first place, so you can solve this issue with the use of the methods mentioned below with relative ease.
So, without any further adieu, let us get to know the answer to the infamous question that goes like this “how to get Windows to recognize my headphones?”.
Ways to know whether the issue is caused by hardware or software?
Before we go any further, it is important to know about the actual cause of this error, be it a software or even a hardware problem. If you try to solve hardware issues via software solutions and vice versa, you will only end up frustrated.
To know how one can determine whether it is a software or hardware issue, you can make good use of the methods that are mentioned below;
Try switching to another audio port
In case your computer has a different audio port, you should try to use that for plugging your headphones into your computer. If everything is fine and the headphones start working, this means that the first port is at fault and is also the reason why your headphones were not showing up in Windows 10.
Try to use a different audio source
If the method mentioned above is not working for you since you do not have multiple audio ports, you can simply try to plug your headphones into another device. If the headphones are working fine on the new device, it means that certain software is at fault in your Windows 10 which is why the headphones are not working.
If the headphones are not working with the new device as well, then the fault resides in the headphones and you might need to switch to new ones.
Now that you know why your headphones are not working, you will be able to fix this issue in a better manner.
Methods to fix when headphones are not showing in Windows 10 (Hardware issues)
When it comes to fixing hardware issues, simply them is pretty easy as they are quite simple and generally require straightforward solutions only. In terms of wired earphones or headphones, hardware issues usually occur because of the port or due to the plug.
All it needs is a quick reset when you are using wired headphones to fix this issue. You can take a look at these hardware issues that can be fixed with the assistance of an experienced professional or simply with the help of articles and tutorials on the internet.
Loose Headphone Jack
Loose headphone jacks can usually cause a lot of problems as the headphones may get disconnected even with the slightest of movement. This becomes a potential problem as it may interfere with your headphones’ connection to the computer.
For instance, if there is some sort of debris or dust inside the jack of your port, it can hinder the user from plugging your headphones properly. This will further lead to your system being unable to detect the headphones.
Bent Headphone Plug
It is common knowledge that headphone plugs are one of the most fragile parts. You may be unable to use your headphones anymore if they get a little bent. Also, you won’t be able to fit your headphones into the audio jack if the plug is bent.
This is also one of the reasons why your computer is unable to detect your headphones.
Wireless Connection Problems
This method is for users who generally work with wireless or Bluetooth headphones. Usually, this can be fixed with a quick factory reset. Once you reset your wireless headphones, it will also help you to remove any saved bugs or overfull Bluetooth connections. Be it issues with pairing to finding a device, a simple reset can fix it all.
Other Headphone Problems
In case you are not facing any of the issues mentioned above, you may be encountering a different type of hardware issue. To prevent further damage from happening and to fix your headphones, getting the specific hardware for your headphone is pretty necessary but it is not as easy as it seems.
You can go to stores for hardware parts if you know for sure that your headphones are broken.
Now that we know about the hardware issues that generally need professional assistance, let us take a look at the software solutions that one can use if the problem is in the system instead of your headphones.
Note: Hardware issues can only be resolved with the assistance of a professional at a repair shop as it requires certain processes that cannot be performed at home.
Ways to fix when your headphones are not showing in Windows 10 (Software Issues)
Software problems require appropriate troubleshooting and may be more complex when compared to visible issues like hardware problems.
Method 1- Manually locate and enable headphones in playback devices
It is often seen that Windows 10 generally disables headphones by default since headphones are not considered as necessary for your system. Here are the steps on how you can manually enable them.
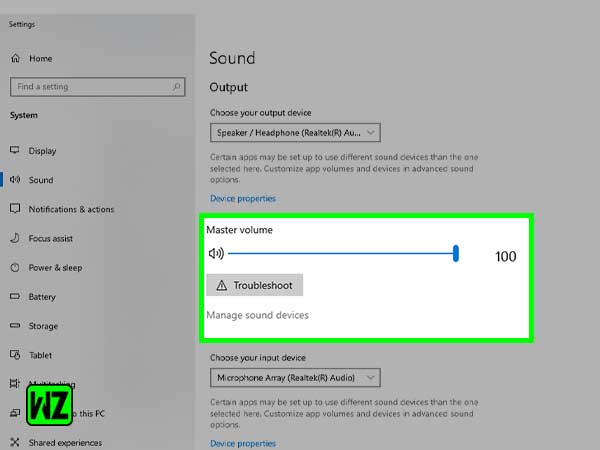
- First off, you will need to locate the sound icon, available at the bottom right corner of your screen, and then right-click on it to select the “open sound settings” option, to begin with.

- From there, you will need to click on the “manage sound devices” option.
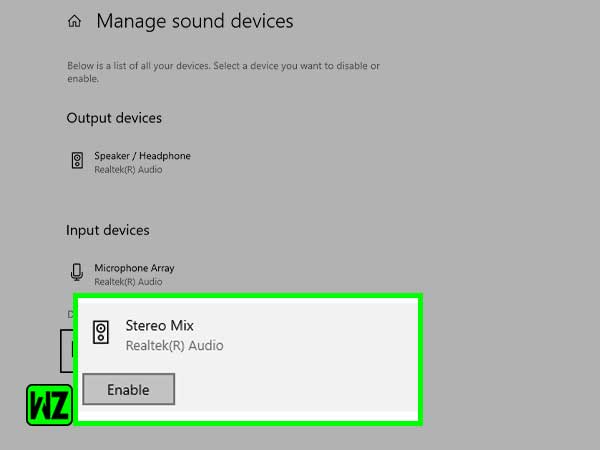
- Now take a look at the devices under the disabled tab.
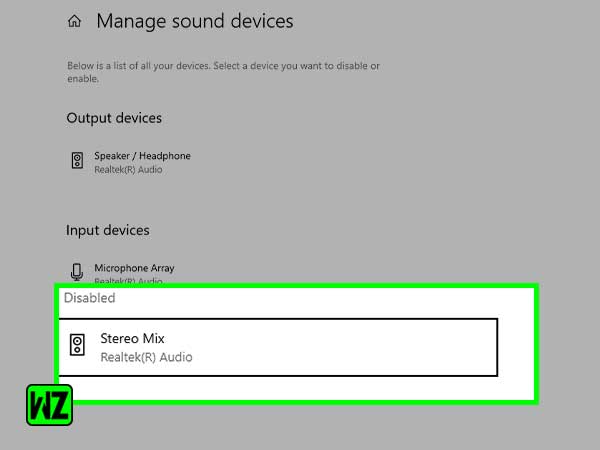
- In case you see your headphones in that tab, simply click on the name of the headphone and then click on “enable”.
Method 2- Make use of the Troubleshooter
There is a built-in troubleshooter for Windows 10 users and was specifically designed to assist you with audio problems that get detected by your system. Microsoft usually recommends this feature to people who face audio-related issues.
Here are the steps to help you in using this brilliant feature.
- As you have seen in the method above, you will need to begin by right-clicking on the icon available on the bottom right corner of your screen, and then click on the “troubleshoot sound problems” option.
- From there, you will need to choose the device which you want to troubleshoot and click next.
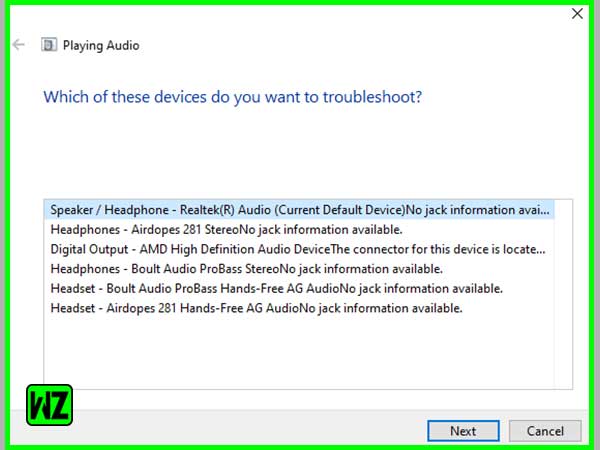
- Simply follow the instructions on the screen to solve your issue with relative ease.
Method 3- Update your audio driver
In case the two methods that are mentioned above do not work out for you, you can try to check your audio driver. It is the function of drivers to allow the hardware devices to be read and recognized by your operating system. This is one of the main reasons why an outdated driver can cause problems when it comes to connecting headphones to your computer.
Although the drivers get updated automatically, sometimes you need to update the drivers manually on your Windows system. This can generally be seen when Windows 10 is unable to recognize a component due to which it renders the device unusable up until it gets updated.
You can use the steps given below to carry out this process without much fuss.
1. Using Windows update
The good thing about this is that Windows update simply shows the packages that are compatible with your system only, saving you from the trouble of downloading the wrong updates. But there is a catch, which is that manufacturers generally take time before making the newer driver available through Windows update.
But even so, with the security that it offers, it remains the best way to download and install drivers manually. Carry out the following steps given below to do so;
- Open the settings of your device and click on the “update and security” option, to begin with.
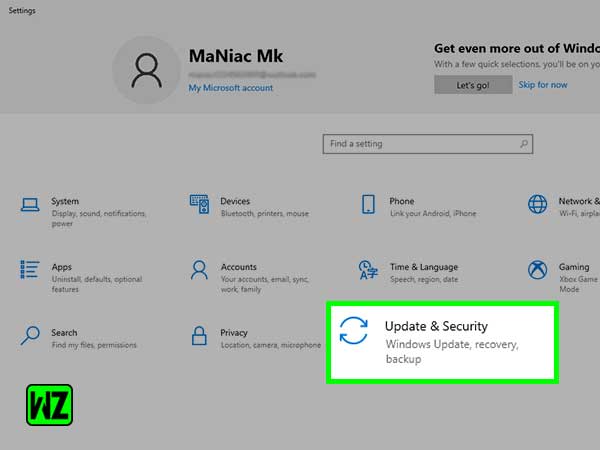
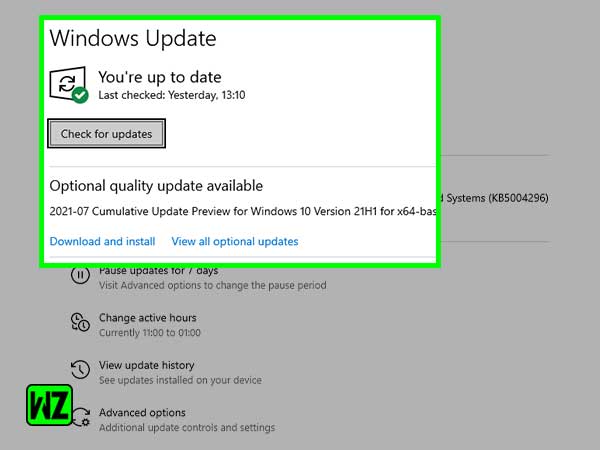
- From there, move to the left side of your screen and select the “Windows Update” option.

- In the next window, you will need to click on the option that says “check for updates” and wait for a while for the outdated drivers to be download and installed automatically.
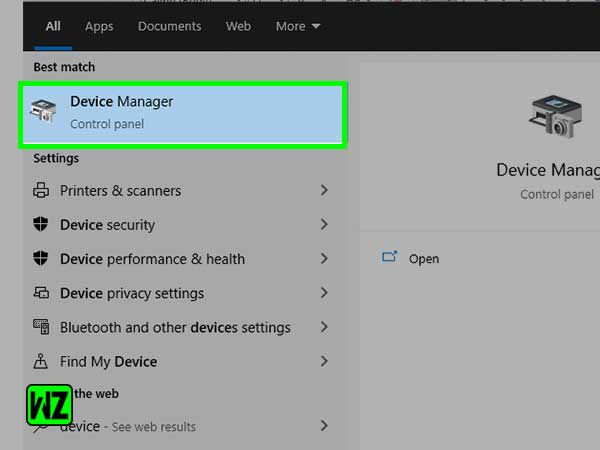
2. Using Device manager
- Click on the start icon and search for the device manager to click on the result.
- Simply expand the “sound, game, and controllers” option by double-clicking on it.
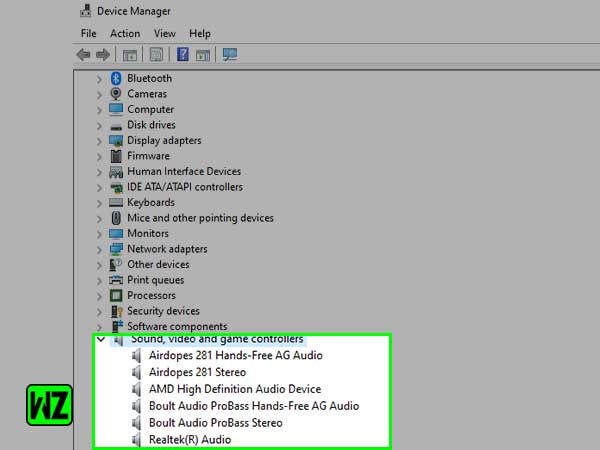
- From there, you will need to right-click on your headphones and select the “update driver” option.
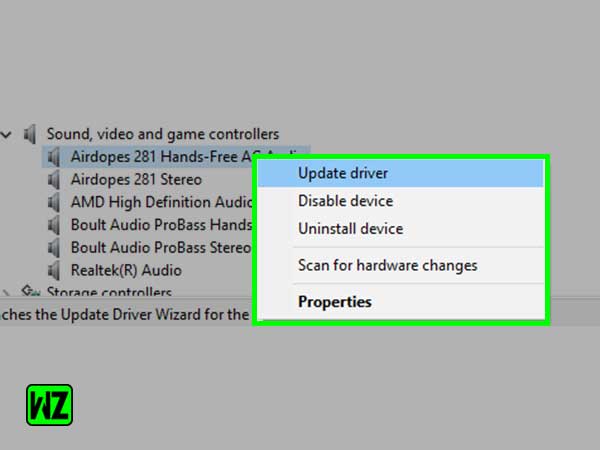
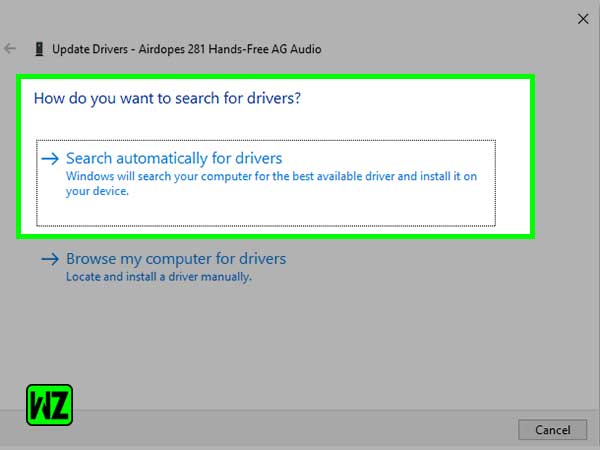
- Now, from the options that appear on your screen, click on the “Search automatically for updated driver software” option.
Method 4- Reinstall or replace the driver
This is a pretty simple way to fix this as all you need to do is to either replace or reinstall the audio driver of your system. It is common knowledge that at times, drivers can have issues themselves, such as getting corrupted.
There is only one way out of such situations and that is to reinstall the driver successfully. You can make good use of the given below to do so;
Note: Only consider this option for the issue if updating your driver is of no use to you.
1. Via the PC manufacturers’ website
The manufacturer knows it best as to which audio chip does your system require which makes this method a quicker way to download the driver by simply visiting the website of the manufacturer.
- Begin by visiting the website of your system’s manufacturer.
- From there, click on the PC option.
- Next, the website will automatically check your device to download driver updates.
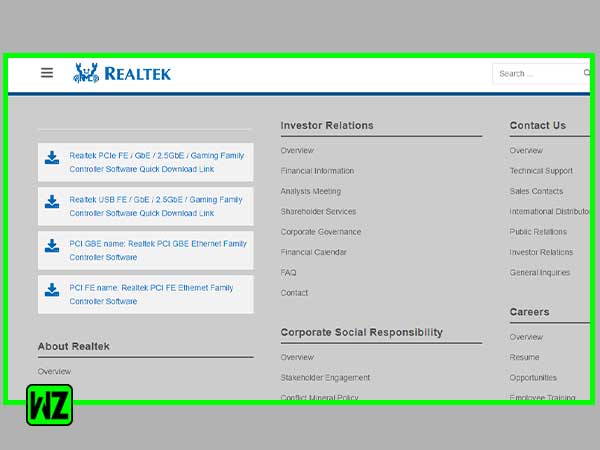
2. Via the website of the drivers’ manufacturer
This way you can get your driver updates directly from the manufacturer’s website with the use of the steps that are given below;
- Open the device manager and identify the manufacturer of your audio chip.
- In the next step, visit the website of the manufacturer.

- Now, from there, you will need to look for the audio card for your machine. Once you have found it, simply download the driver to finish.
Method 5- Enable the stereo mix
At times, even the simplest of things such as enabling the stereo mix can fix when your headphones are not showing up in playback devices in Windows 10. It is a simple yet effective Windows feature that allows the user to record sounds that the device is outputting, simply by routing the audio from output to input.
It may help you detect some audio which can further lead to detecting your headphones if you enable this option. You can do so with the help of the steps that are given below;
- You will need to right-click on the sound icon at the bottom right corner of your screen and select the “open sound setting” option from the menu that opens up.
- From there, locate the “manage sound devices” option.
- Now, check the devices that are under the headline disabled.
- Simply click on the stereo mix from there and enable it.
Method 6- Disable the front panel of jack detection
A pop sound comes up as soon as you plug in your headphones, which makes you think that the PC should detect the headphones from the audio jack automatically, along with a notification that the headphones are now plugged in.
But sometimes this jack gets bugged or corrupted which further leads to your system being unable to send audio to your headphones in an appropriate manner. You can fix this simply by disabling the front panel of the jack detection as that will stop the disturbances, further helping you to enjoy the sound that you want to.
Follow the steps given here to know how to do so;
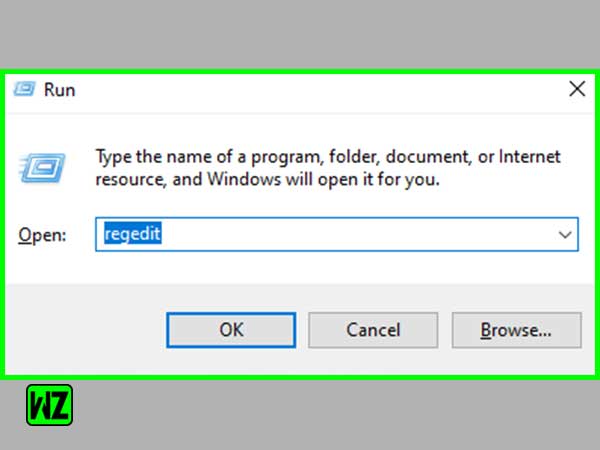
- Start by opening the run dialogue box by using the Windows+R keys together. In the run search utility, type “Regedit” and click on ok.
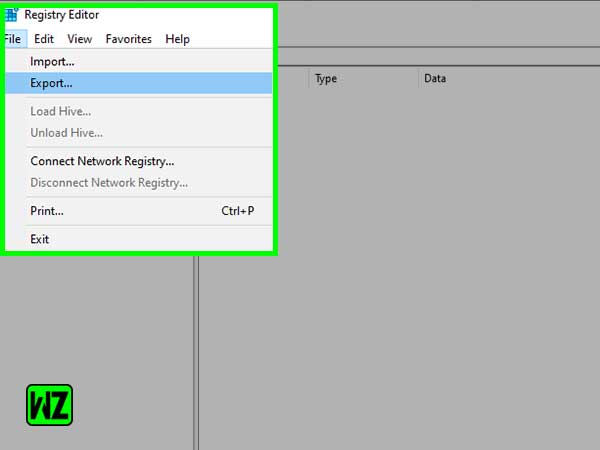
- Before you proceed any further, click on the File tab to select import so to create a registry backup first to make sure that if any unwanted results appear, you can simply use the same file tab and select import to revert the changes made.
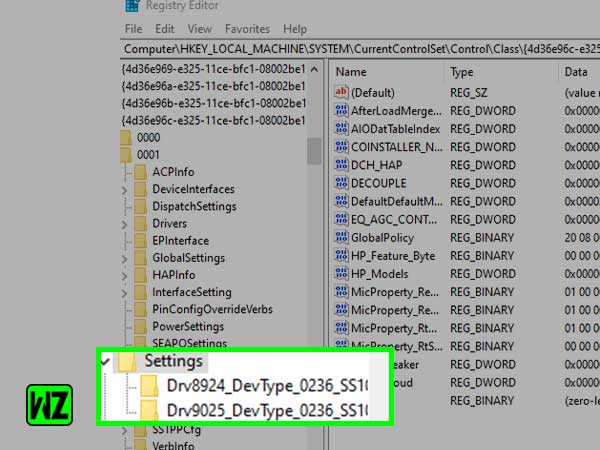
- After the backup is done, simply copy and paste this in the path address bar of the registry editor. HKEY_LOCAL_MACHINE\SYSTEM\CurrentControlSet\Control\Class\{4d36e96c-e325-11ce-bfc1-08002be10318}
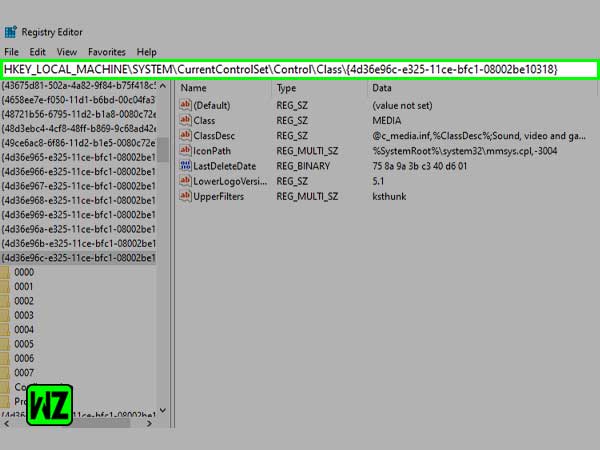
- In the next window, you will need to expand all the folders that start with 000.
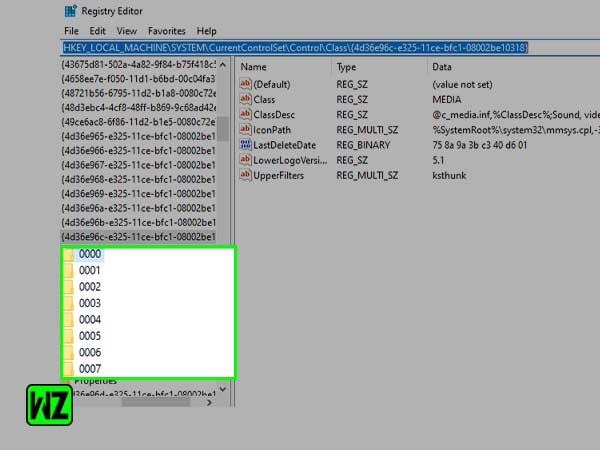
- You will also need to expand the setting folder if a setting folder is just below these folders. In case you see a folder with the name Drv8186_DevType, click the settings option once again.
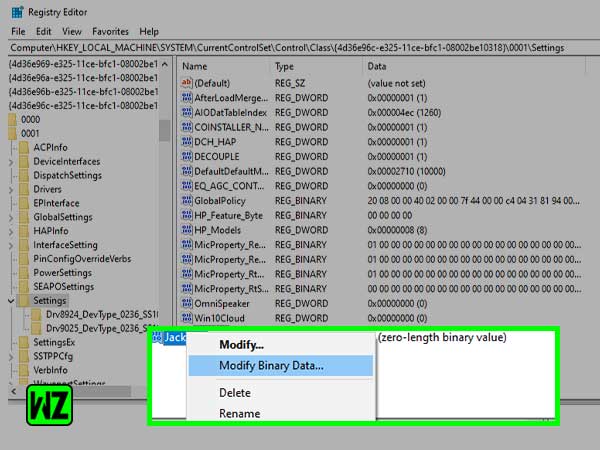
In the right menu, right-click and create a new binary value by the name of JackCtrl.
- After you are done, modify the binary value of it and enter FF 82 40 00.
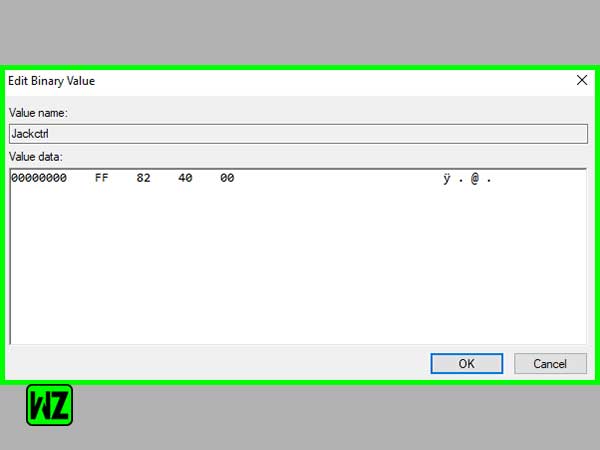
- Simply close the editor and reboot your PC to finish.
And just like that, you are done. These are some of the simple methods that one can use to fix the headphones not getting detected on their Windows 10 system.
Conclusion
Headphones are used by pretty much everyone these days, be it a teenager or an adult as they are quite easy to carry and also offer mobility.
Windows 10 is not the best when it comes to being bug and error-free. Issues like when your speakers or even your headphones are not showing up in playback devices in Windows 10 are pretty common and are pretty easy to solve as well unless you have a broken headphone or speaker at your hands.
You can simply use the methods that are mentioned above to make sure that you get to enjoy the way you want to with your headphones without breaking a sweat.
Likewise, you can read the following posts regarding issues on Windows 10:
- What Is WMI Provider Host? How to Fix (WmiPrvSE.exe) High CPU Usage on Windows 10?
- A simple Guide to Fix the Nvidia Control Panel Missing Issue in Windows 10
- How to Fix ‘Windows 10 Wi-Fi Disconnects Randomly and Won’t Reconnect’ Issue?
- Avast Antivirus Won’t Open in Windows 10? Here are the Solutions to Try!