How to Fix ‘Windows 10 Wi-Fi Disconnects Randomly and Won’t Reconnect’ Issue?
Almost all the Windows users who’ve upgraded their Windows O.S. in the recent past are now reporting to have issues with their Wi-Fi. For instance, the followings—
| Err_internet_disconnected |
| Wi-Fi disconnects randomly |
| Wi-Fi gets disconnected after sleep |
| Wi-Fi keeps dropping |
| Wi-Fi not getting connected |
| Wi-Fi disconnects with VPN or when other devices connect |
| Wi-Fi not getting detected |
| Wi-Fi getting limited access |
Well, from the users’ complaints, it is concluded that Windows 10 internet (Wi-Fi) either disconnects randomly and restores in a few seconds or it just disconnects and won’t reconnect until the users restart their respective systems.
So, if you’re also one of those users who keep on losing the Wi-Fi connection on Windows 10 after updating your Windows operating system and wondering “Why does my Wi-Fi keep disconnecting?” Then, let us tell you that the reasons for such types of problems are of various types and to get enlightened about the same, read this below-given list of—
Possible Reasons That Causes ‘Wi-Fi to Keep Disconnecting in Windows 10’ Issue
- Hardware: Normally, “Wi-Fi keeps disconnecting” issue occurs more in old laptops/PCs because of the hardware failure.
- Wi-Fi Sense: This feature that Windows 10 introduces to let you automatically connect to other open wireless networks can cause your system to disconnect from the Wi-Fi network while trying and connecting to another network nearby.
- Drivers: If the Wi-Fi driver software isn’t updated or the same is corrupted/ damaged then, this error can occur because drivers take care of the functionality of your connected hardware and thus, the same needs to be updated regularly.
- Power Management: Albeit, Microsoft has done good by introducing power management options that reduce power usage to increase your device’s battery life. But, when it finds out that power usage hits a specific amount on your Windows 10 PC/Laptop then, it can disable various hardware including your ‘Wi-Fi adapters,’ causing your device to frequently disconnect from the network.
- Router: Oftentimes, you also lose access to your Wi-Fi network, and it keeps on disconnecting randomly when your router isn’t functioning properly because it is either damaged or not placed in proximity to your device.
- Wireless Adapter: Last but not least, if the Wi-Fi channels frequency range detection gets changed in your Wireless Adapter configuration settings then, this wrongly configured wireless adapter can cause your Wi-Fi to keep disconnecting.
Now, as you along with us have identified the possible causes behind the “Wi-Fi Keep Disconnecting in Windows 10” error; it’s time to get familiar with the 12 troubleshooting methods that focus on fixing the “Windows 10 Internet Disconnects Randomly 2020” issue!
However, before you begin, consider these two prerequisites to fulfill so that the repair process runs smoothly—
- Backup All Your Data: In some of the below listed methods you need to change account settings and this can lead to the loss of data under some specific circumstances. So, it is therefore recommended that you back up all your important data on an external drive in advance. [Note: Out of all, consider backing up your user folder that you can find in C:\Users location.]
- Gain Access to an Administrator Account: There are also such methods in this guide that require you to have administrative permission. So, it means you’ve to gain access to an administrator account. Basically, you require using a local account that has assigned the role of an ‘Administrator.’
After you finish meeting these above-listed prerequisites, you are recommended to start troubleshooting with these quick fixes that potentially restore your internet connection within a couple of minutes:
- Quick Fix 1: Restart your Windows PC.
- Quick Fix 2: Restart your Router or Set it to Default Settings.
- Quick Fix 3: Update your Wi-Fi Firmware Drivers as well as Wi-Fi Adapter Drivers. [Note: To avoid outdated products or malware, make sure to update firmware drivers only by downloading from the Manufacturer’s site.]
- Quick Fix 4: Connect with your Internet Service Provider (ISP) to fix any connection issue within your location.
Well, if these quick fixes able to help you resolve the internet keep disconnecting error then, well and good otherwise, you can start fixing the error with the following methods—
12 Effective Methods to Resolve ‘Wi-Fi Keeps Disconnecting in Windows 10’ Issue
[Note: You may or may not need to try all the methods listed here. Just work your way down the list and see which method works best in your case.]
Method 1: Change Your Home Network to Private and Not Public
Many a time, what comes out to be the culprit for frequent issues that you encounter with connecting to the internet is nothing but the “Poor Wi-Fi Settings.” Well, because setting your Home Network to Public may likely cause issues with the connection. So, you should check whether you’re also having your Home Network public or not! If yes then, set it to ‘Private’ with these simple steps—
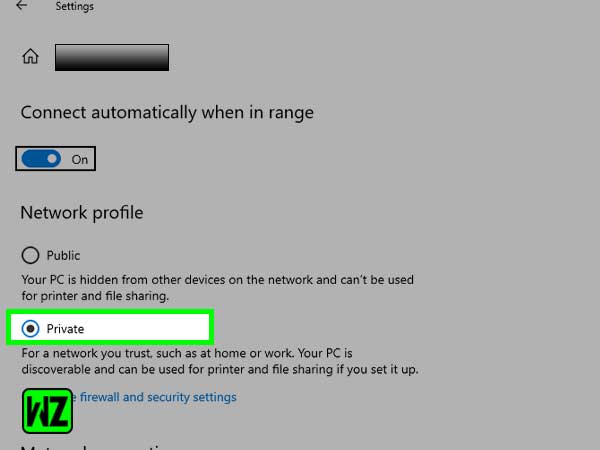
- Step 1: Look at your device’s system tray and click on the ‘Network & Internet’ icon. [Note: if it isn’t located there then, click on the arrow that point upward so that you can reveal all the hidden items including the ‘Network & Internet’ icon.]
- Step 2: Then, you’ve to click on the specific ‘Network’ that you’re connected to!
- Step 3: Following that, click on the ‘Properties’ link.
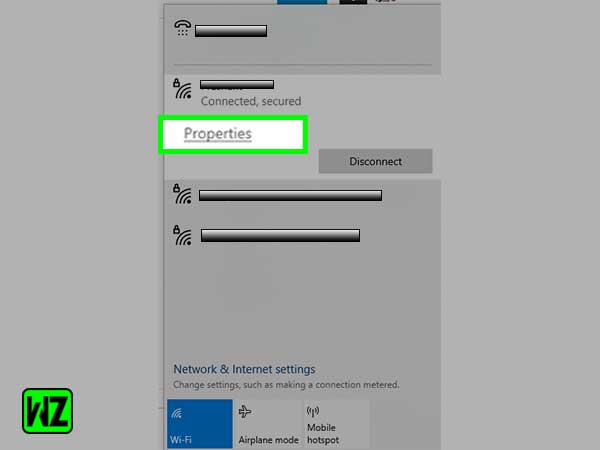
- Step 4: Inside properties window, click on the ‘Network profile heading’ to finally change the Home Network connection from ‘Public’ to “Private” and this should only be done when you trust the Wi-Fi network you’re connected to!
After you set your Home Network to Private instead of Public, you can simply check if your Wi-Fi still keeps disconnecting or whether the issue has been resolved now.
Method 2: Disable Wi-Fi Sense
Despite the fact that Wi-Fi Sense was originally made for (that is to make it easier for Windows 10 users to connect to other Wi-Fi networks), it can be a problematic feature when it comes to interference in network connection.
Thus, it is recommended that you disable Wi-Fi Sense and check whether it is the one that is causing the “Internet keep disconnecting” issue or not!
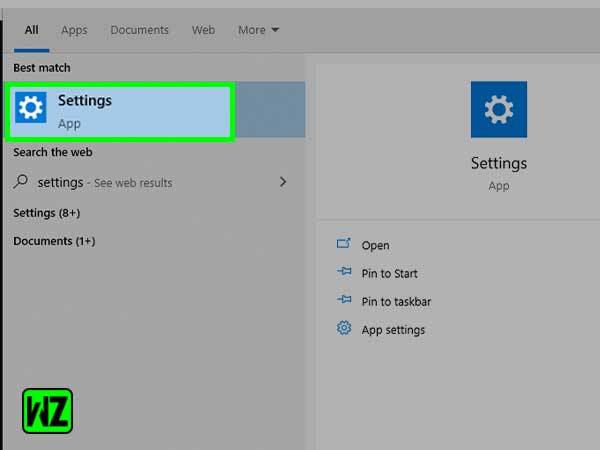
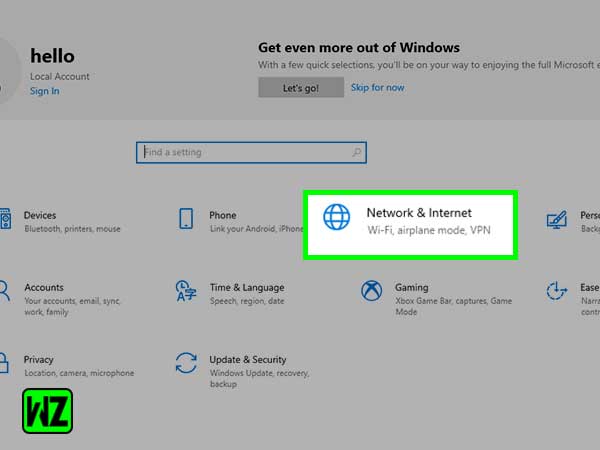
- Step 1: To disable Wi-Fi Sense, begin by clicking on the ‘Windows Icon’ in your Taskbar. In doing so, the Windows Start menu will appear on the screen and from the same, click on the ‘Settings’ option. Alternatively, you can open Windows Settings by using ‘Win + I’ keyboard shortcut.
- Step 2: On the Windows Settings page, click on the ‘Network & Internet’ section.
- Step 3: Then, simply switch to the Wi-Fi section using the menu on the left-hand side.
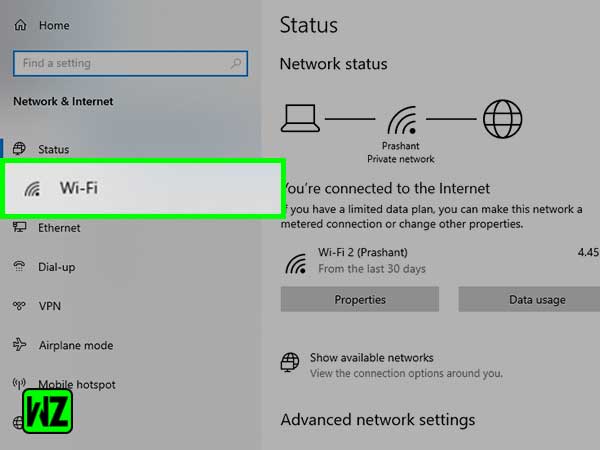
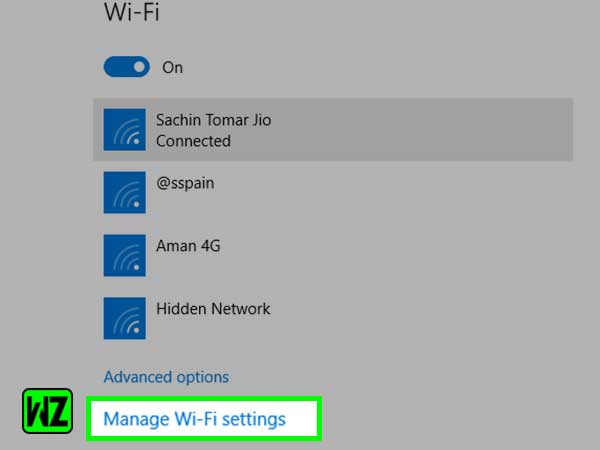
- Step 4: After you switch to the Wi-Fi section, click on the ‘Manage Wi-Fi Settings’ link which you’ll be able to locate under the details of your current connection.
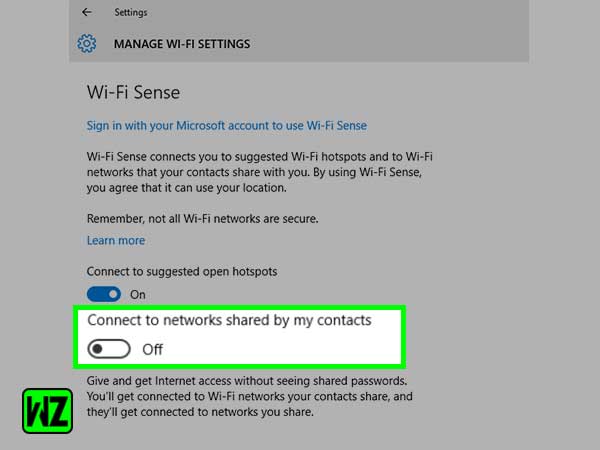
- Step 5: Following that, you’ve to scroll down the page until you reach the ‘Wi-Fi Sense’ section. There, all you have to do is toggle the switch under “Connect to networks shared by my contacts” heading to ‘OFF’ and ensure disabling the Wi-Fi Sense feature.
Now, just check if your Wi-Fi still has disconnecting issues or not! However, do not forget to restart your computer in between you made the above changes and check your Wi-Fi for connection.
Method 3: Fix Your Power Management Settings
Next, there’s a huge possibility that your Power Management settings are disabling your Wi-Fi adapter from time and again and that’s why you’re facing the outcome of its temporarily disconnecting.
However, if this comes out to be the case then, worry not you can fix your Power Management settings easily by keeping your Wi-Fi Drivers ‘ON’ with these below-given steps—
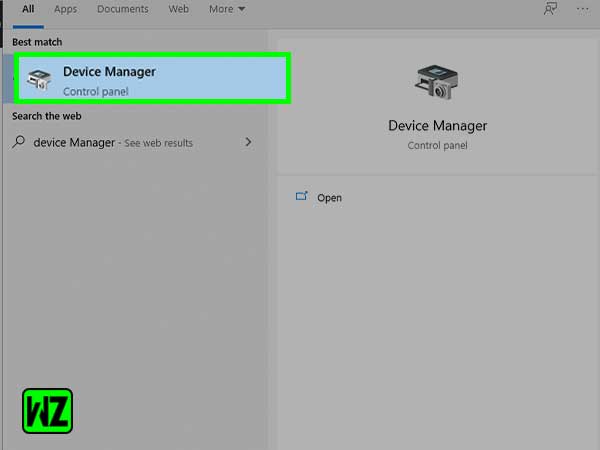
- Step 1: Open Device Manager. To do so, press the ‘Windows + X’ keys together on your keyboard and click on the ‘Device Manager’ option from the menu that appears on the screen.
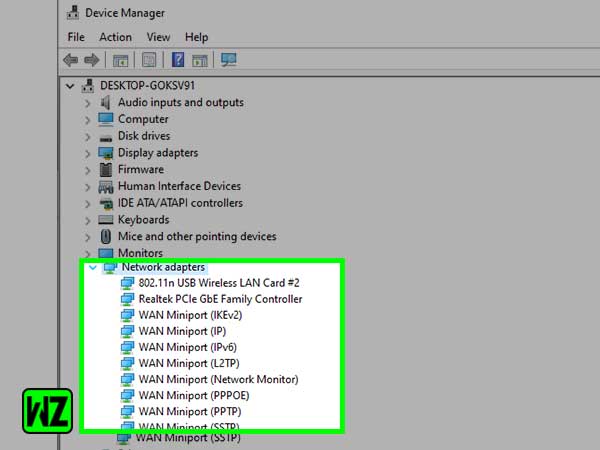
- Step 2: Inside the Device Manager Window, you’ve to expand the ‘Network Adapters Menu’ simply by clicking on the arrow beside it.
- Step 3: Next, what you need to do is double-click on your respective ‘Network Adapter.’
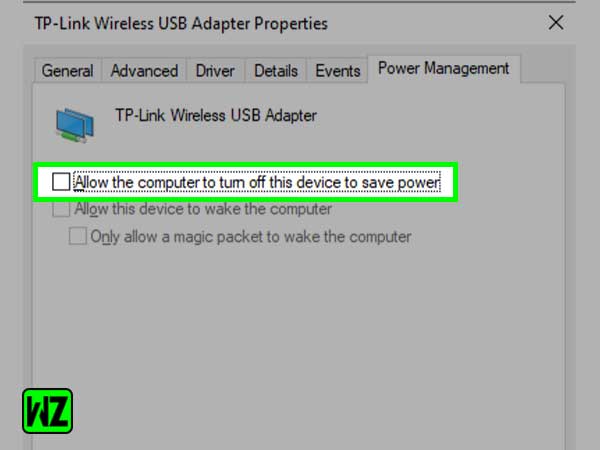
- Step 4: Following that, open the ‘Power Management’ tab in the new window. There, you’ve to simply uncheck the box that reads—“Allow the computer to turn off this device to save power.”
- Step 5: After doing so, click on the ‘OK’ button and give a quick restart to your computer.
Now, test whether you’re still experiencing “Windows 10 won’t stay connected to Wi-Fi”
or it has been resolved using this method.
Method 4: Run the Network Troubleshooter
This is all we (Windows users) know that Microsoft Windows especially Windows 10 comes with various “Troubleshooters” that time and again helps us to get rid of plenty of common issues and bugs. Thus, eliminating the need of contacting customer support!
Having said that, there’s this ‘Network Troubleshooter’ that you can run to identify and automatically fix the issue you’re encountering with your Wi-Fi.
However, if you don’t have any idea how to run the ‘Network Troubleshooter’ to fix the issue with your Wi-Fi then, here are the steps to be performed!
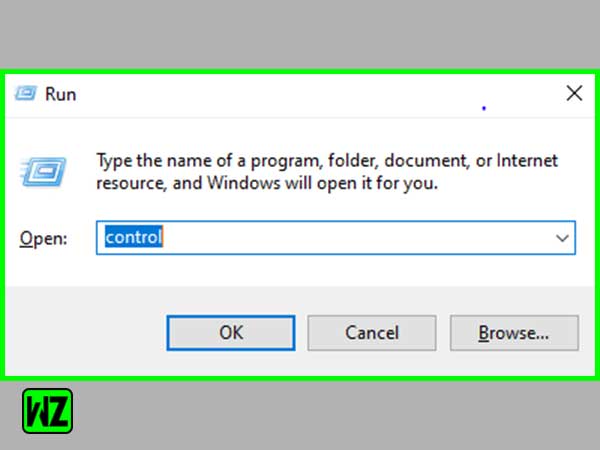
- Step 1: Open Windows Run Utility box by pressing ‘Win + R’ hotkeys together on your keyboard.
- Step 2: In that utility box, type “Control” and hit the ‘OK’ button to open the Control Panel app.
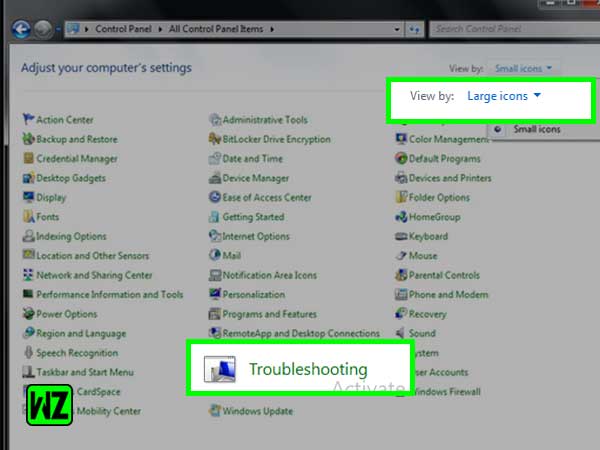
- Step 3: Once the Control Panel is open, what you’ve to do is set the ‘View Mode’ to ‘Large Icons’ and then choose the ‘Troubleshooting’ option from the available options icon.
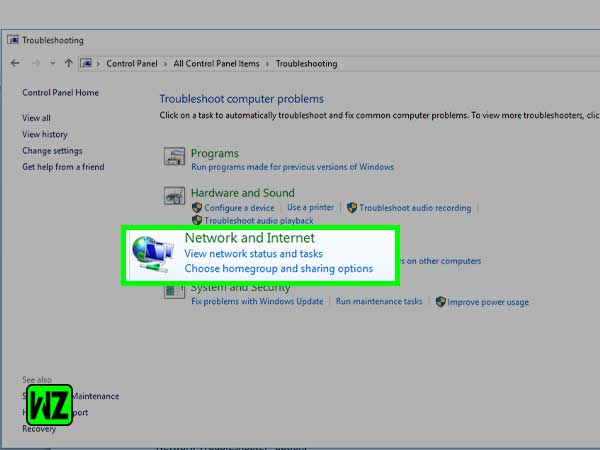
- Step 4: Following that, you need to simply click on the ‘Network and Internet’ option.
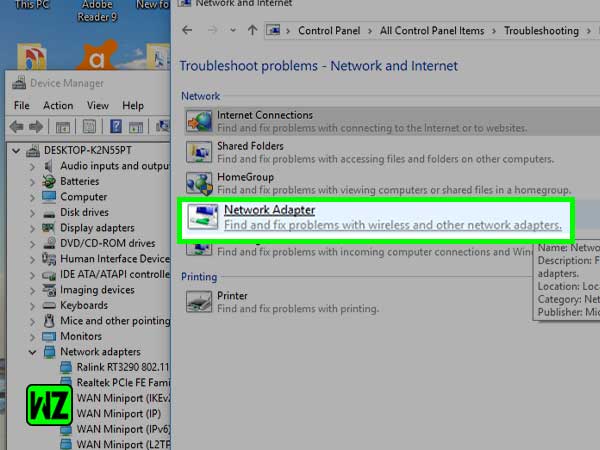
- Step 5: After that, a new window will open and inside that, you’ll have to choose the ‘Network Adapter’ option.
- Step 6: Once you do so, follow the on-screen instructions to let the Network Troubleshooter automatically repair your system connection for any detected errors.
Now, when everything is done, give a quick restart to your device and see if you’re still experiencing Wi-Fi issues or not!
Method 5: Run the Wi-Fi ‘WLAN AutoConfig Service’ to Set As ‘Automatic’
Well, you never know, maybe a disabled ‘Wi-Fi AutoConfig Service’ is forcing your Wi-Fi to behave in this unusual and unexpected way. However, there’s a simple fix to this particular case and according to that you have to reset the problematic service. For doing so, these are the steps to be executed—
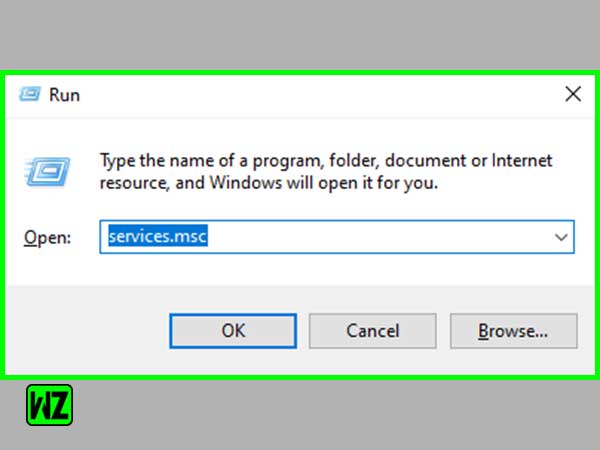
- Step 1: Launch the ‘Windows Run Dialog Box’ by pressing ‘Win + R’ keyboard shortcut.
- Step 2: In the utility box, type “services.msc” and hit the ‘OK’ button. In doing so, the Services Window will open in front of you.
- Step 3: Inside the services window, you’ve to locate the ‘WLAN AutoConfig’ entry and when you’re able to locate the same, perform a right-click action on it.
- Step 4: Following that, choose the ‘Properties’ option from the contextual menu that pops up on the screen.
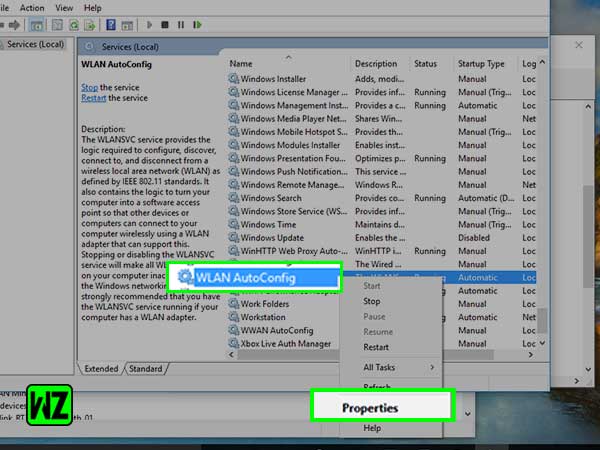
- Step 5: Under the properties window, what you’ve to do is change the ‘Startup type’ to ‘Automatic.’
- Step 6: After that, click on the ‘Apply’ button and just close the window by pressing the ‘OK’ button.

Once the window closes, restart your computer and test whether you still have Wi-Fi connection issues in your Windows 10 PC or not. If not, then move onto the next method.
Method 6: Update Your Wireless Drivers
Outdated or corrupted drivers can be another possible culprit behind why your Wi-Fi is continuously disconnecting. Yes! They can cause a whole lot of annoying issues on your computer operating system. So, considering that, you need to ensure that your drivers are up-to-date and running on the latest version. While doing so, if any driver seems to be outdated then, update it to possibly fix any issues with your Wi-Fi on Windows 10.
- Step 1: To begin, press the ‘Win +X’ hotkeys together and in doing so, a menu list will pop up from which you’ve to click on the ‘Device Manager’ option.
- Step 2: Inside Device Manager, expand the ‘Network adapters’ menu and for that use the arrow which is next to it.
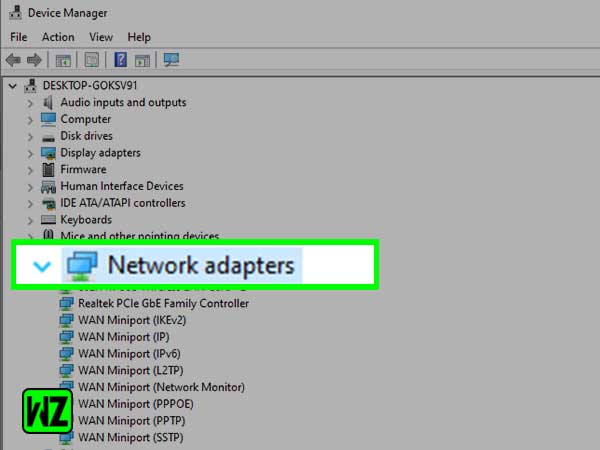
- Step 3: Then, what you’ve to do is double click on your ‘Adapter.’ By doing so, a new window will open and on the same, you’ll have to switch to the ‘Driver’ tab.
- Step 4: Under it, click on the ‘Update Driver’ button to allow Windows 10 to either look for the newest driver on your local computer or online.
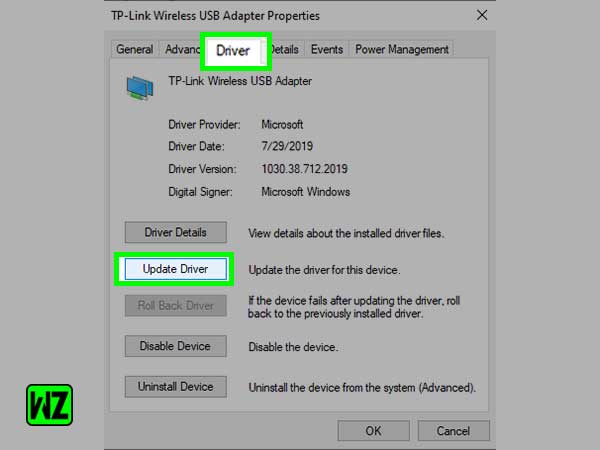
- Step 5: Once it’s done, you’ll be prompted to follow the on-screen instructions and install the updated version of wireless driver on your respective computer.

However, if Windows 10 doesn’t detect any driver updates then, it’s suggested that you check the manufacturer’s website for any possible updates. There, if you find an updated driver, you can proceed to manually install it on your device.
Now, once you’re done updating your Wireless drivers, restart your computer and test if the Wi-Fi disconnecting error has been resolved, or it is still prevailing!
For the latter case, Windows users can further try the following 6 additional methods that are also considered effective in resolving “Windows 10 Wi-Fi Disconnects and Won’t Reconnect” issue—
Method 7: Disable 802.11n Mode in Wi-Fi Config
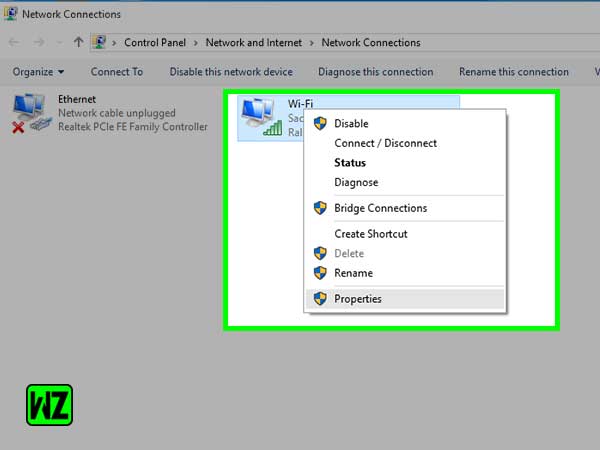
- Step 1: Open Windows Search by pressing ‘Win +S’ keyboard shortcut. Inside the search box, type ‘Network Connections,’ select the same from the search result and hit the ‘Enter’ button.
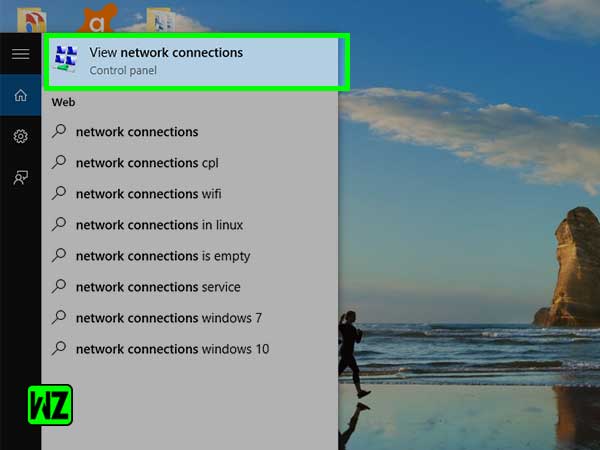
- Step 2: In doing so, the Network and Sharing Center window will open in front of you and from it, you’ll have to right-click on the ‘Wi-Fi’ that you’re currently using on your respective device.
- Step 3: After that, click on the ‘Properties’ option from the contextual menu that pops up on the screen.
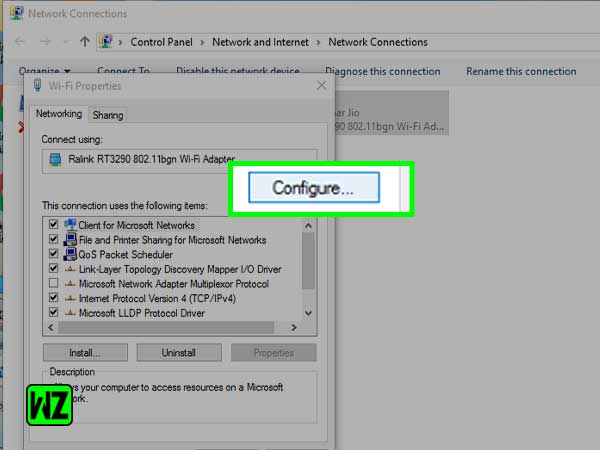
- Step 4: Inside Properties window, click on the ‘Configure’ option.
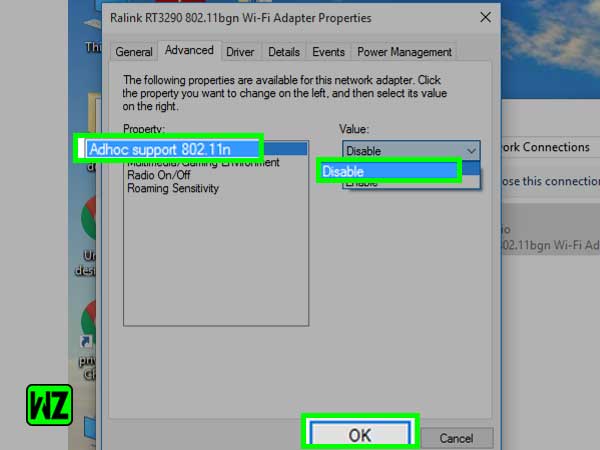
- Step 5: Following that, click on the ‘Advanced’ tab.
- Step 5: From the Advanced tab, select disabled for “802.11n mode” and once you select the same, just click on the ‘OK’ button.
Method 8: Change Wireless Adapter’s Power Saving Mode
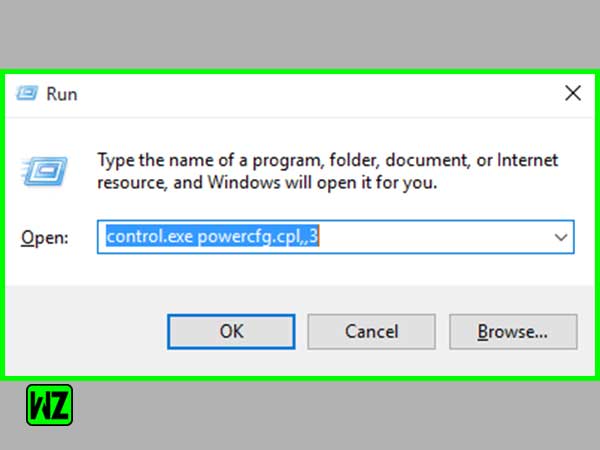
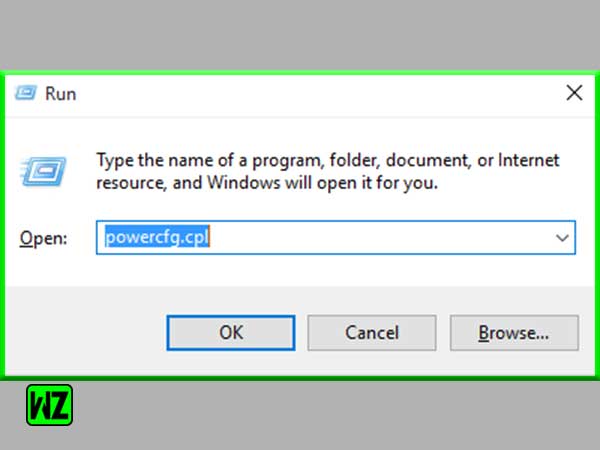
- Step 1: To do so, open ‘Windows Run Utility Box’ by pressing ‘Windows key +R’ together.
- Step 2: Inside it, type “control.exe powercfg.cpl,,3” and then, hit the ‘OK’ button.
- Step 3: In doing so the ‘Power Options’ window will open and there, click on the ‘Drop-down arrow’ to select the ‘High performance’ option from the menu that appears.

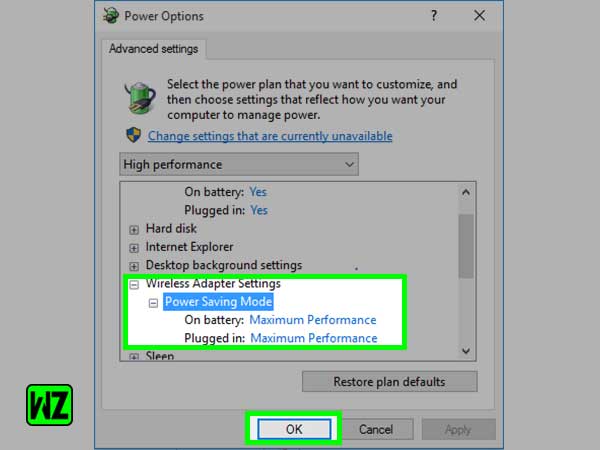
- Step 4: After that, double-click on the ‘Wireless Adapter Settings’ to expand it.
- Step 5: Following that, double-click on the ‘Power Saving Mode’ option of Wireless adapter settings to expand it as well.
- Step 6: Now, select ‘Maximum performance’ from the drop-down menu (if not automatically selected) both “On Battery and Plugged-in” settings.
Additionally, you can also consider switching to high performance mode via the following steps—
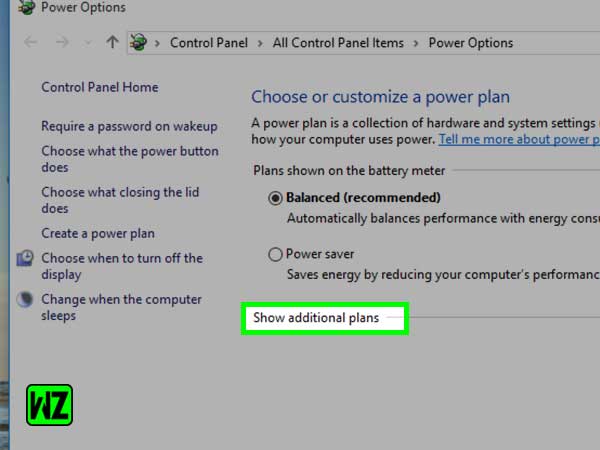
- Step 1: Search “powercfg.cpl” in Windows 10 Search Box.
- Step 2: Then, click on ‘Show Additional Plans’ from the ‘Power Options’ window.
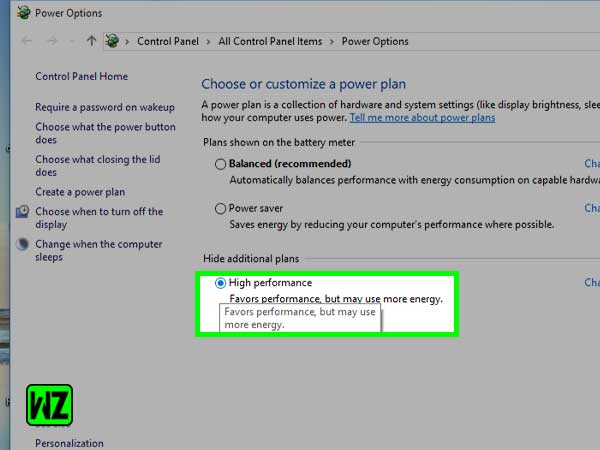
- Step 3: After that, simply select the ‘High Performance Plan’ from the additional plans that you’ve explored.
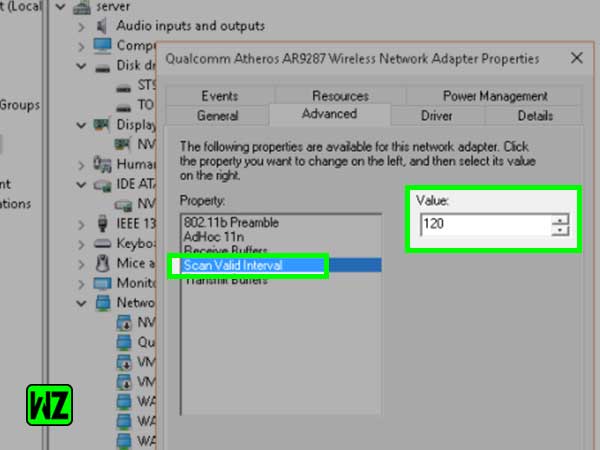
Method 9: Modify Scan Value Interval
- Step 1: To change the scan value interval, press ‘Win +S’ keys together and type “Network Connections” inside the Windows Search box that appears.
- Step 2: Then, just click on the ‘Network Connections’ search result to open the same.
- Step 3: Inside the Network Connections window, you’ve to perform the right-click action on the Wi-Fi that you’re currently using.
- Step 4: After that, click on the ‘Configure’ option inside the Properties window.
- Step 5: Following that, click on the ‘Advanced’ tab and inside it, select the ‘Scan value interval’ option to set its value to “120.”
- Step 6: Upon doing so, simply hit the ‘OK’ button and close the window.
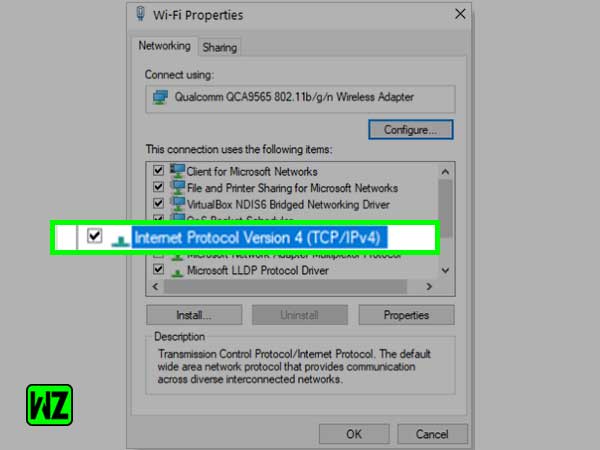
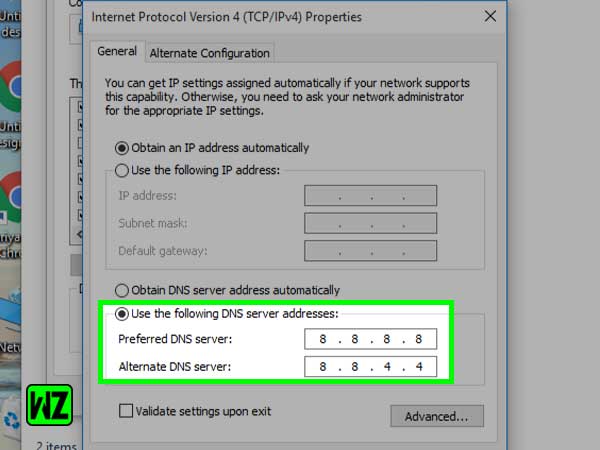
Method 10: Change DNS Network Settings
- Step 1: Press ‘Win +S’ keyboard shortcut to launch Windows Search box. Inside that, type “Network” and hit the ‘Enter’ button.
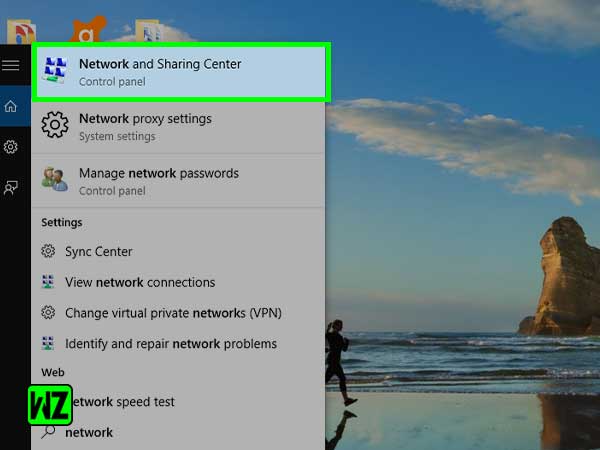
- Step 2: In doing so, the Network and Sharing Center Window will open in front of you. In that, you’ve to perform the right-click on your ‘Wi-Fi’ that you’re currently connected to!
- Step 3: Then, click on the ‘Properties’ option from the contextual menu that appears.
- Step 4: After doing so, what next you’ve to do is double-click on ‘Internet protocol version IPV4.’
- Step 5: Following that, select ‘Use the following DNS server’ option to enter—
- 8.8.8.8 in front of Preferred DNS Server fields provided.
- 8.8.4.4 in front of Alternate DNS Server fields provided.
- Step 6: In the end, just hit the ‘OK’ button to apply the made changes.
Method 11: Reset TCP/IP Configuration Settings
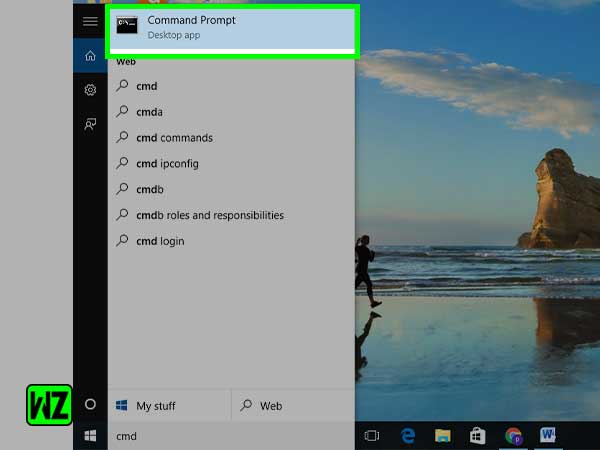
- Step 1: To reset TCP/IP configuration, begin by searching “cmd” in Windows 10 Search box.
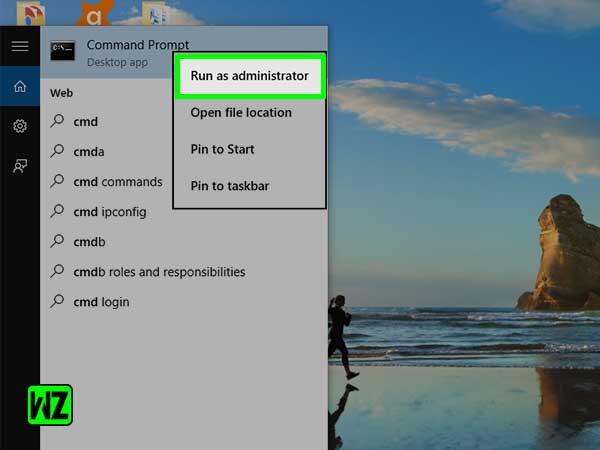
- Step 2: In doing so, a list of search results related to the same will appear on the screen, and you’ve to perform the right-click action on the ‘Command Prompt’ icon.
- Step 3: As you do so, a contextual menu will pop up and from the same, click on ‘Run as Administrator’ option.
- Step 4: After that, you’ve to copy the below-given commands (one by one) and paste them in the ‘Command Prompt’ window.
| ipconfig /releaseipconfig /renewarp -d *nbtstat -Rnbtstat -RRipconfig /flushdnsipconfig /registerdnsnetsh winsock resetnetsh int ip reset c:\resetlog.txt |
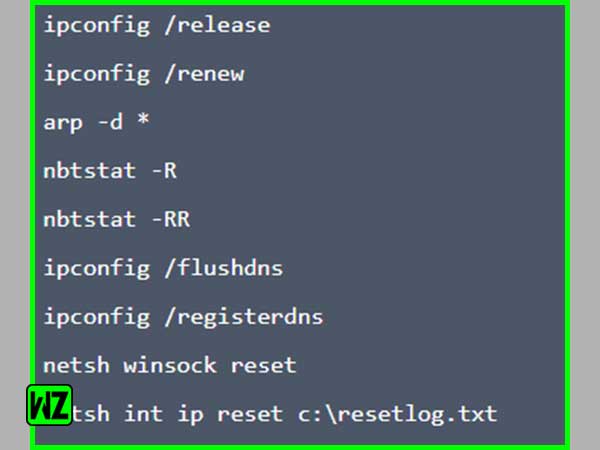
- Step 5: While doing so, do not forget to hit the ‘Enter’ butter after pasting each of them.
Method 12: Change Your Wi-Fi Channel to Least Crowded Channel
If none of the above given methods works in your favor then, at last consider changing your Wi-Fi Channel because some Wi-Fi channels overlap each other (if you’re living at a place for instance in a flat or apartment where multiple Wi-Fi routers are used) and this results in weakening your Wi-Fi signal.
So, it is suggested that you find out whether your Wi-Fi router is using a very busy Wi-Fi channel or not. If it is using then, follow these steps—
- Step 1: Firstly download the “WiFiInfoView” tool from here.
- Step 2: Then, once it’s downloaded, go to your device’s download section and perform the right-click action on the ‘WiFiInfoView’ tool.
- Step 3: In doing so, a contextual menu will appear and from it, click on ‘Extract to a specified folder.’

- Step 4: Following that, you’ve to select a favorable location on your driver to extract the WiFiInfoView files.
- Step 5: Upon doing so, navigate yourself to the same location where you’ve extracted the WiFiInfoView tool to double-click and “Run” the same.

- Step 6: This way, you’ll have a list of Wi-Fi routers that are around you. From the list, look for those routers that are using the least crowded channel because more the number of Wi-Fi routers, more is the overlapping of the Wi-Fi signals.

- Step 7: Now, you’ve to simultaneously open the ‘Router Settings’ page in your preferred web browser and there, go to the ‘Wireless Settings’ tab.
- Step 8: There, click on the ‘Channel’ option as it will present in front of you the list of available channels from 1 to 11 (for 5GHz router) of your router.
- Step 9: Now, you’ve to simply choose the least crowded channel among all the options of Wi-Fi Channels that are available.
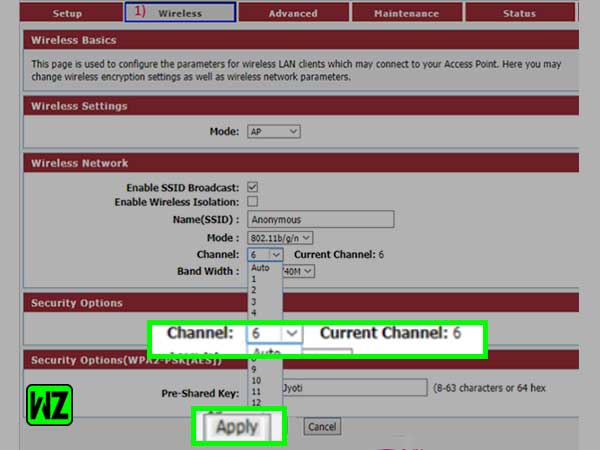
- Step 10: In the end, just click on the ‘Apply’ button to apply the made changes.
After you finish doing so, make sure you reboot your router to imply the changes you’ve made.
Bottom Line
That’s all. Hopefully, this troubleshooting guide that we’ve come out with, will be able to help you get rid of the “Wi-Fi frequently and randomly disconnecting on Windows 10” you’re experiencing and then, you’ll be able to enjoy your internet browsing experience like you used to before!
Similarly, you also like to read the following related posts: